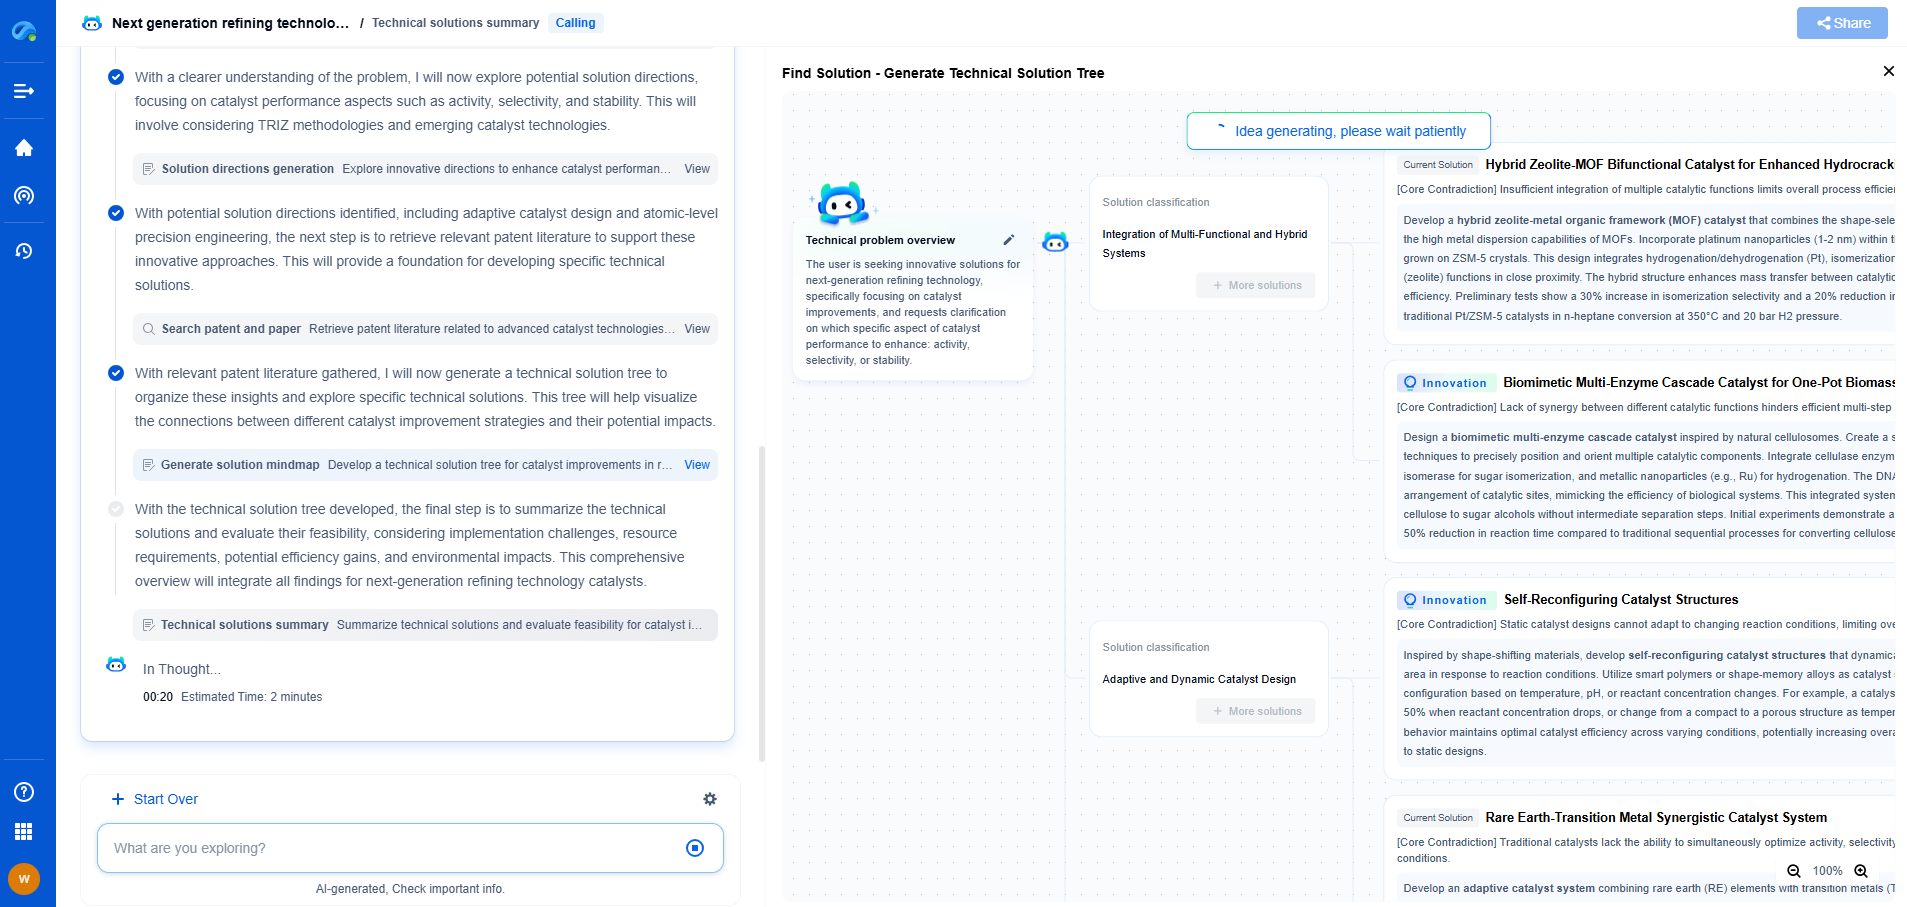
How to Set Up an Ultrasonic NDT System for Flaw Detection
JUL 16, 2025 |
Ultrasonic Non-Destructive Testing (NDT) is a widely used technique for detecting flaws in materials without causing any damage. This method employs high-frequency sound waves to identify imperfections such as cracks, voids, and inclusions within a material. Setting up an ultrasonic NDT system effectively is crucial for obtaining accurate and reliable results.
Understanding the Components of an Ultrasonic NDT System
Before diving into the setup process, it's important to familiarize yourself with the key components of an ultrasonic NDT system. The main elements include the transducer, pulser-receiver, display device, and calibration block. The transducer generates ultrasonic waves and receives the echoes reflected from flaws. The pulser-receiver sends electrical pulses to the transducer and processes the returning signals. The display device, often a screen or monitor, visualizes the data, while the calibration block is used to calibrate the system for accurate measurements.
Preparing the Workspace
Setting up an ultrasonic NDT system begins with preparing the workspace. Ensure that the testing area is clean, quiet, and free from vibrations that could interfere with the test results. The environment should provide a stable platform for the equipment, allowing for precise calibration and accurate measurements. Adequate lighting and comfortable working conditions also contribute to better focus and efficiency during testing.
Choosing the Right Transducer
Selecting the appropriate transducer is a critical step in setting up your NDT system. The choice depends on several factors, including the material being tested, the type and size of potential flaws, and the required testing depth. Transducers come in different frequencies and sizes; higher frequencies provide better resolution but lower penetration depth, while lower frequencies offer deeper penetration but reduced resolution. Consult manufacturer specifications and testing requirements to make an informed decision.
Calibrating the System
Calibration is essential for ensuring the accuracy and reliability of the ultrasonic NDT system. Use the calibration block to set reference points for sound velocity, material thickness, and flaw detection sensitivity. Follow these steps for calibration:
1. Connect the transducer to the pulser-receiver.
2. Apply a couplant, a gel-like substance, between the transducer and the calibration block to facilitate sound transmission.
3. Adjust the settings on the pulser-receiver to match the specifications of the calibration block.
4. Use the reflected signals from known features within the block to fine-tune the display device for accurate readings.
Conducting a Test
With the system calibrated, you are ready to conduct a test. Begin by applying a couplant to the surface of the material being inspected. This ensures optimal sound wave transmission and reception. Position the transducer at the starting point and gently move it across the surface, maintaining consistent pressure and speed. Observe the display device for any reflections that indicate potential flaws. Document the location and characteristics of any detected anomalies for further analysis.
Interpreting the Results
Interpreting the results of an ultrasonic NDT test requires a good understanding of material properties and flaw characteristics. Analyze the echoes displayed on the screen to determine the type, size, and location of detected flaws. Compare the findings with the material specifications and acceptance criteria to assess the severity and implications of the imperfections. In some cases, additional testing or cross-verification with other NDT methods may be necessary to confirm the results.
Ensuring Safety and Compliance
Safety is paramount when conducting ultrasonic NDT tests. Ensure that all equipment is properly maintained and calibrated according to industry standards. Operators should be trained and certified in ultrasonic testing procedures to minimize the risk of errors or accidents. Additionally, follow any regulatory guidelines and compliance requirements specific to your industry to uphold the integrity of the testing process.
Conclusion
Setting up an ultrasonic NDT system for flaw detection involves careful consideration of equipment, calibration, and testing techniques. By understanding the components, preparing the workspace, selecting the right transducer, and conducting precise tests, you can achieve accurate and reliable results. Remember to prioritize safety and compliance throughout the process, ensuring a successful and efficient inspection.
In the world of vibration damping, structural health monitoring, and acoustic noise suppression, staying ahead requires more than intuition—it demands constant awareness of material innovations, sensor architectures, and IP trends across mechanical, automotive, aerospace, and building acoustics.
Patsnap Eureka, our intelligent AI assistant built for R&D professionals in high-tech sectors, empowers you with real-time expert-level analysis, technology roadmap exploration, and strategic mapping of core patents—all within a seamless, user-friendly interface.
⚙️ Bring Eureka into your vibration intelligence workflow—and reduce guesswork in your R&D pipeline. Start your free experience today.
Features
- R&D
- Intellectual Property
- Life Sciences
- Materials
- Tech Scout
- Unparalleled Data Quality
- Higher Quality Content
- 60% Fewer Hallucinations
Learn More Browse by: Latest US Patents, China's latest patents, Technical Efficacy Thesaurus, Application Domain, Technology Topic, Popular Technical Reports.
© 2025 PatSnap. All rights reserved.Legal|Privacy policy|Modern Slavery Act Transparency Statement|Sitemap|About US| Contact US: help@patsnap.com