Method of making a three-dimensional flower pillow/cushion

Inactive Publication Date: 2004-03-30
MALDONADO DORIS BAILEY
15 Cites 6 Cited by

AI-Extracted Technical Summary

Problems solved by technology

Some are even fanciful and ornate.
It cannot be used in certain rooms in the home.
The disadvantage suffered by the prior art three-dimensional flower shaped pillow/cushions are several fold in that they ...

Benefits of technology

It is therefore an object of this invention to provide a method of ma...

Abstract

A decorative pillow with all the individual proportions of the flower represented by the pillow. Each pillow consists of a center (a), individual petals that are fashioned in the shape of the petals of the flower being duplicated (b), leaves which correspond with each flower (c), a potpourri pouch (d), in which to add potpourri, and a bottom (e).

Application Domain

PillowsArtificial flowers and garlands +5

Technology Topic

CushionFishery +2

Image

  • Method of making a three-dimensional flower pillow/cushion
  • Method of making a three-dimensional flower pillow/cushion
  • Method of making a three-dimensional flower pillow/cushion

Examples

  • Experimental program(1)

Example

Each Perennial Pillow is fashioned in the shape of the pillow it represents. The method of fabrication begins by cutting and sewing each piece separately and putting them together one piece at a time. The center is fashioned first. The petals and leaves are arranged according to those of the flower being imitated. They are then attached to the center. A bottom is added to each pillow for a neat finish.
After being cut out, the petals are sewn one at a time leaving an opening for stuffing. They are then stuffed with a stuffing material such as, but not limited to polyfil, and sewn up. The petals are attached to the center to form the pillow.
The leaves are sewn, stuffed and turned. Next, the veins are sewn in. A pouch is added to one leaf. This is done by marking the leaf where a fastening means such as, but not limited to, a commercially and readily available hook and loop type will be attached.
The fastening means is attached to the leaf and to the pouch section. The pouch is sewn on the side of the leaf opposite the fastener side with the fastener still on the top side of the pouch section. When the pouch has been sewn into place, turn the leaf and the pouch is made.
The pillow is given a smooth finish by adding a bottom. The bottom is sewn and stuffed loosely. It is then attached to the underside of the pillow.
The present invention is described hereinafter by a detailed description of the preferred embodiments, which are presented in conjunction with, and by reference to, the accompanying drawings, in which the reference characters refer to like or corresponding parts.
The preferred embodiments illustrated are not intended to be exhaustive or to limit the invention to the precise form disclosed. The method of fabricating flowers having different characteristics and shapes has been chosen and are herein described in order to best explain the invention and its practical utility to enable others skilled in the art to best utilize the invention.
In order to eliminate unnecessary descriptive material and to focus on the invention, the fabrication of the leaves, for each flower will only be broadly explained and described once, as the leaves vary in shape according to each particular flower but are otherwise assembled in like fashion.
It will not be repeated in the description of each individual flower and leaf that the basic materials needed are fabric, thread, scissors and fill material. A skilled artisan will understand that the fabrics will be selected so that they reflect the artisan's interpretation of the most suitable colors befitting a selected flower. The fill material may be natural down fibers, synthetic fibers or polyfil, at the discretion of the artisan.
As previously stated, because the leaves are made in the same fashion for each flower/pillow, the fabrication of a simple leaf will be explained. Each leaf is cut to size and shape befitting the leaves of the flower being simulated. Two leaves are used for each flower.
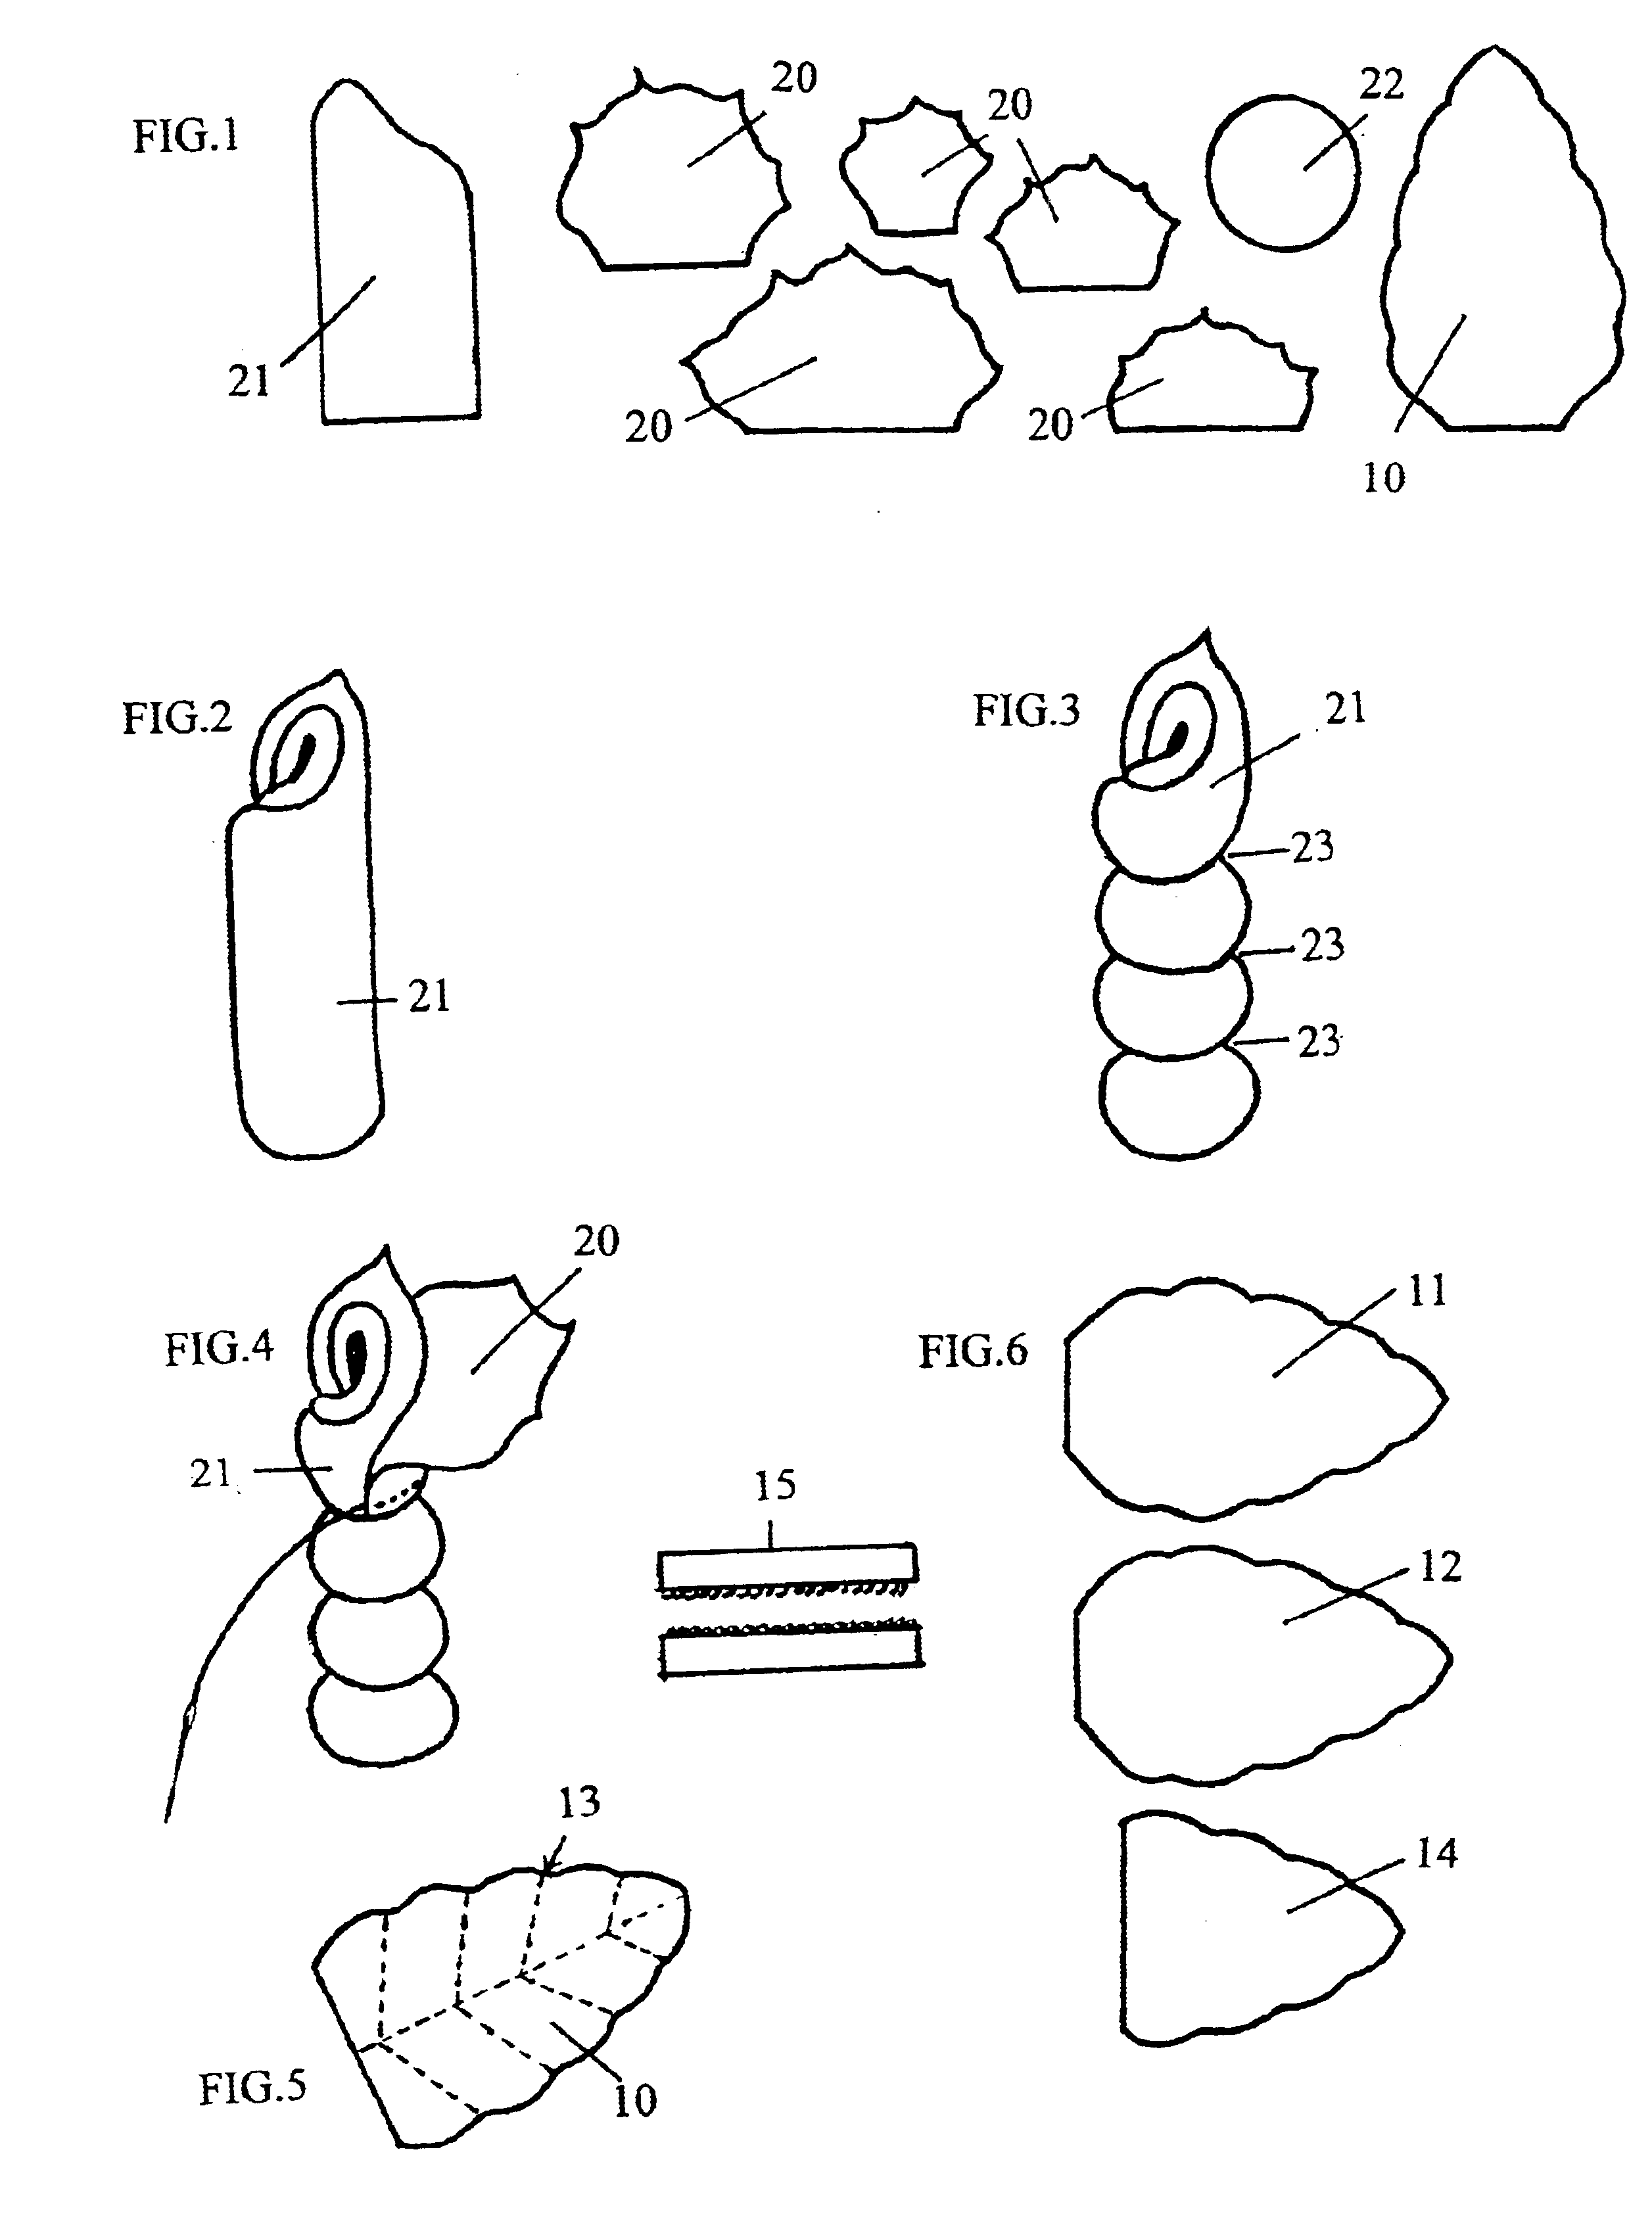
The first leaf 10, has upper 11, and lower 12, portions, and is fabricated by sewing, turning, stuffing and closing. Veins 13 are then sewn into leaf 10, to simulate the veins in the leaf of the specific flower.
The second leaf is sewn using three sections, as depicted in FIG. 6, top section 11, bottom section 12, and pouch section 14,. Fastener means is also needed for the leaf.
While other fastening means may be used, a hook and loop type fastener 15, such as one sold under the trademark of Velcro is preferred.
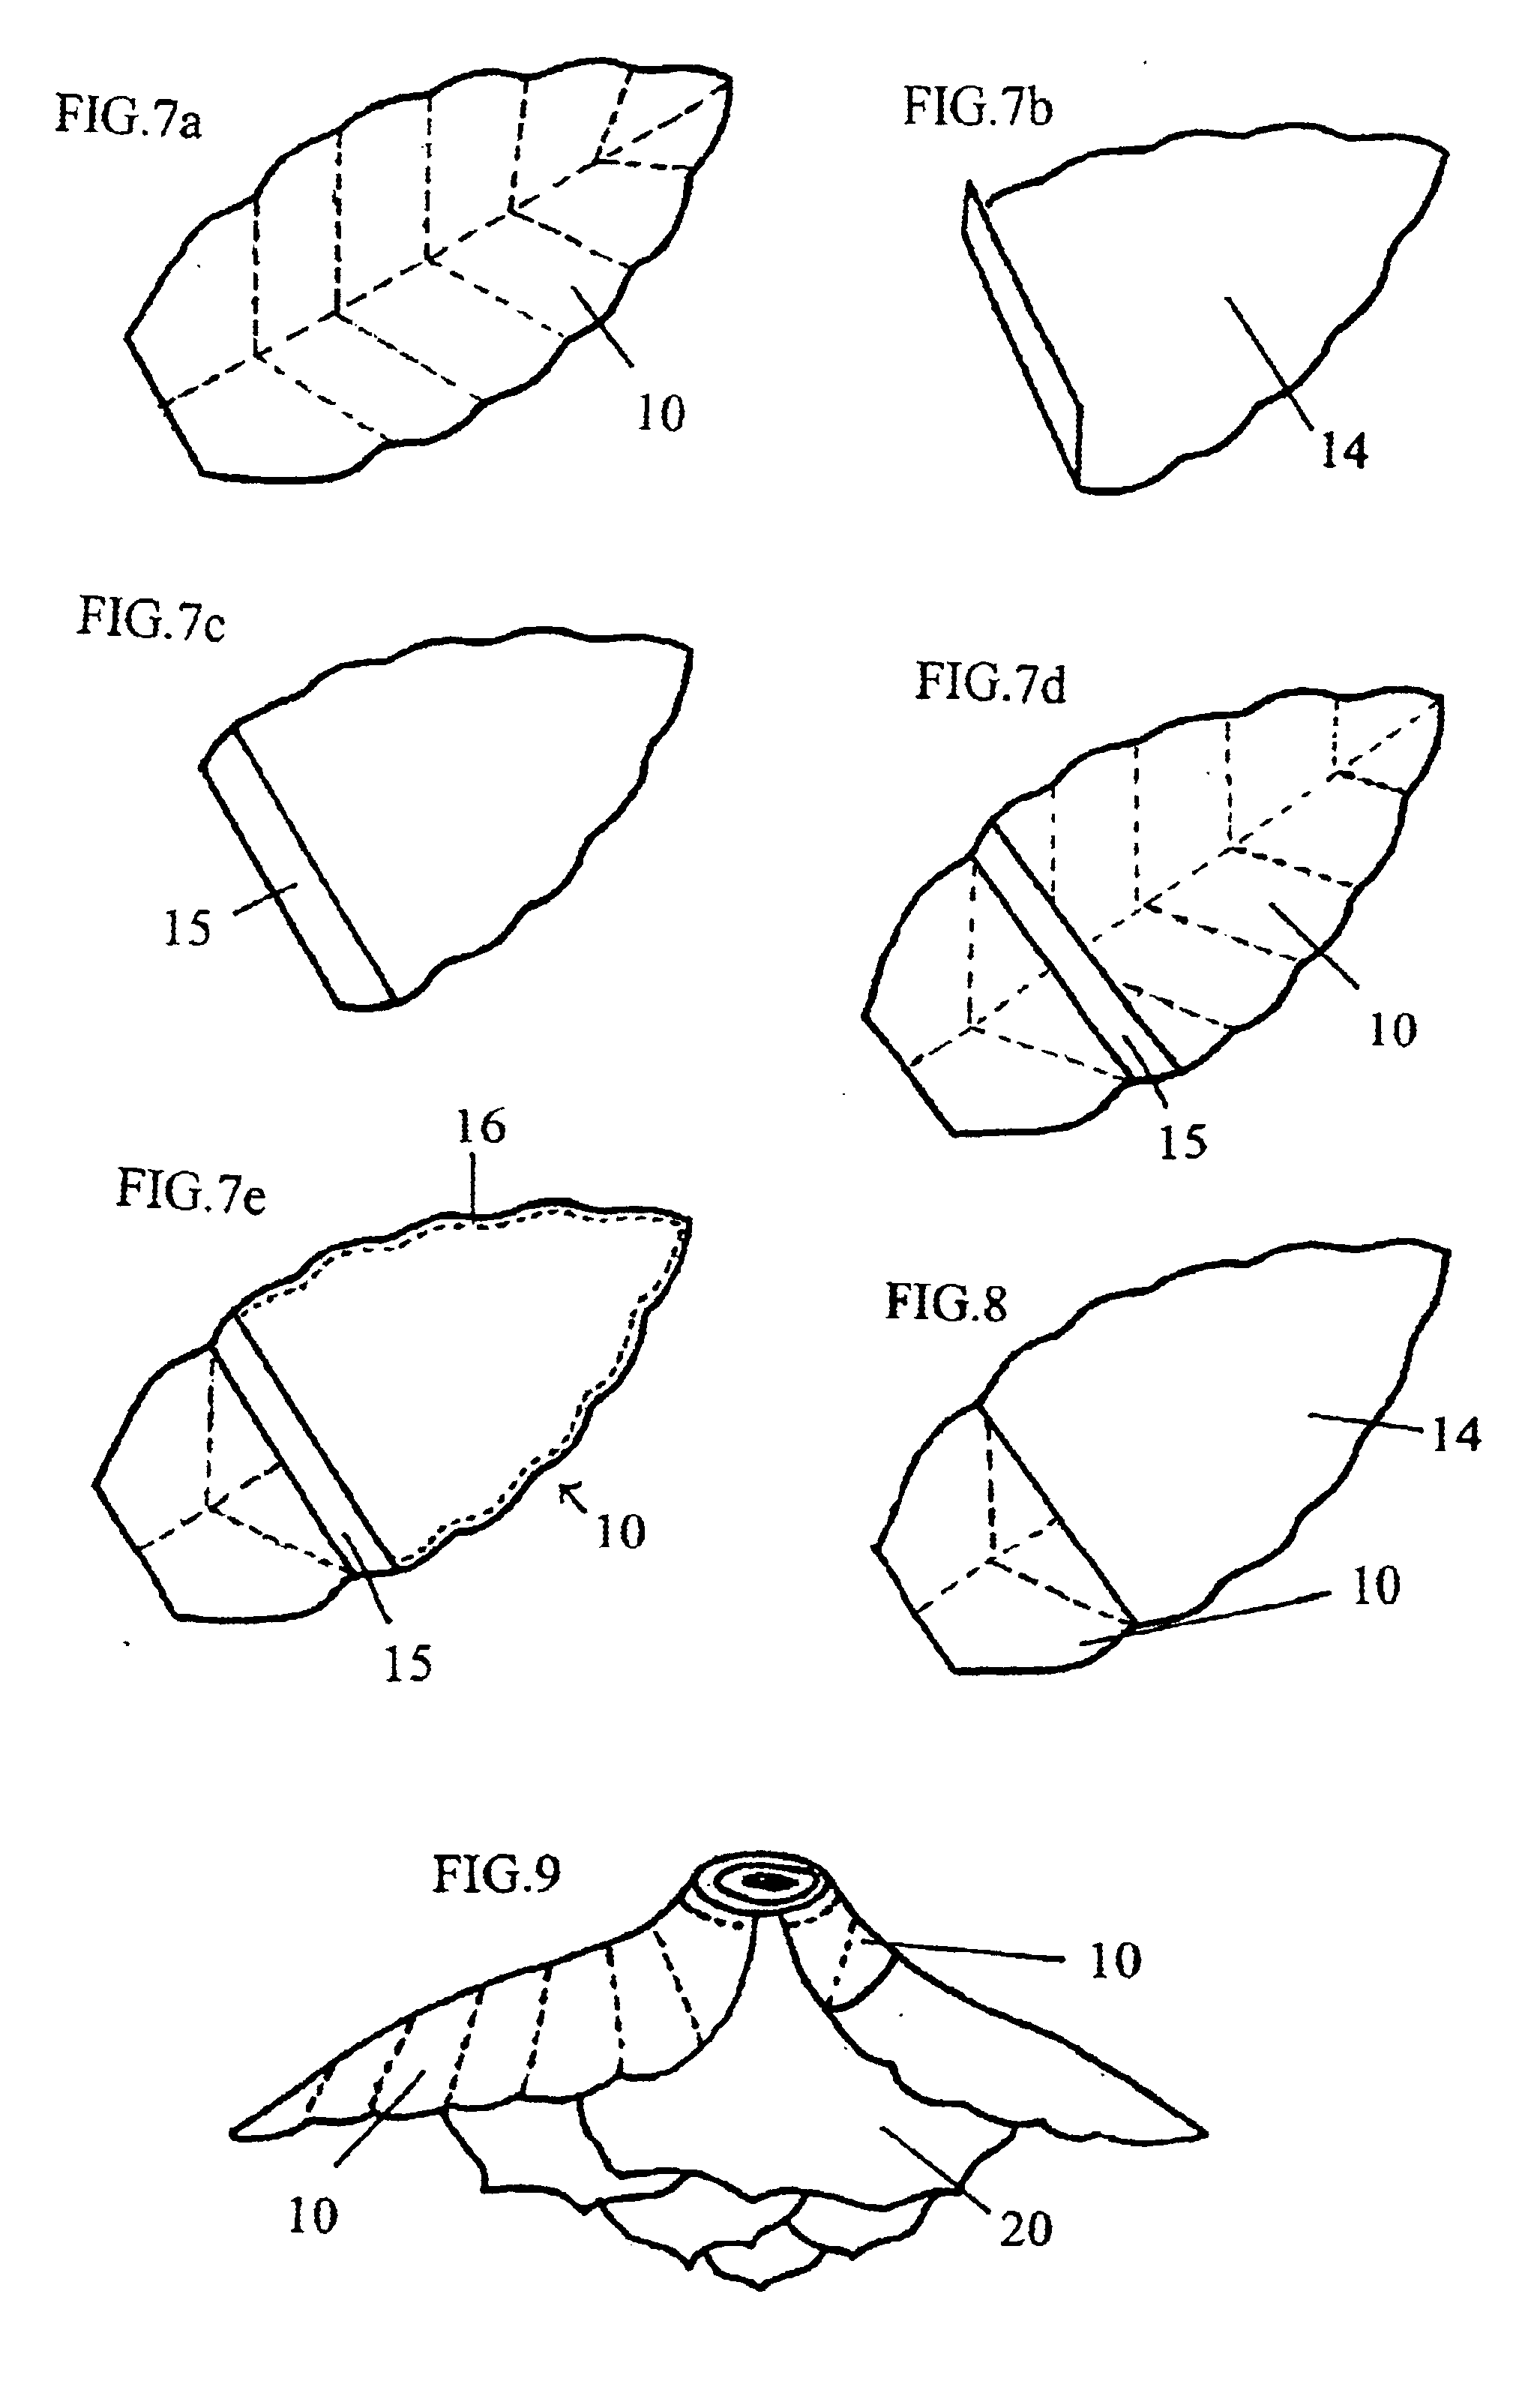
Initially, the second leaf is sewn in the same fashion as the first leaf, in that the two same-sized portions 11,12, are sewn together, as shown in FIGS. 7(a)-7(c). However, seam 16, around the outside is sewn closer to the edge than the seam of the first leaf. As shown in FIG. 6, pouch section 14 of the leaf is shorter than the other two portions.
The bottom of pouch portion 14 of leaf is folded, Fig. 7(b), and placed with bottom turned up and with its back to the middle section. One portion of the hook and loop type fastener 15 is attached to the folded over portion. The middle section is thus marked by a suitable implement, such as a sewers marking pencil to indicate the position at which the mating portion of the hook and loop type fastener 15 will be fixed, indicated in FIG. 7d. With all three sections of the leaf in place, the sections are sewn together around the periphery of the leaf. The pouch is accordingly completed and the leaf is ready for mounting to the flower, with the pouch facing underneath the flower/pillow.
The following is a preferred embodiment of the method of this invention and is a step by step description of the fabrication of typical seasonal flower/pillows according to this invention.
The basic principle used in making a three-dimensional multi-petal flower shaped pillow in the form of a rose is as follows:
Step 1-Petals, center, leaves and bottom are cut out. The size and shape of the petals will vary as they do on roses. The number of petals used to make the rose is left to the discretion of the individual making the pillow.
Step 2-The petals 20, leaves 10, center 21, and bottom 22, are sewn separately, leaving a hole open for stuffing on each piece. Once each piece has been stuffed, the petals are ready to be put together to form a rose.
Step 3-Starting with the middle of center 21, FIG. 2, fold it over keeping the piece in a vertical position. While center is folded, wrap twine 23 around most of the center starting about one third of the way down the center FIG. 3 Secure the twine.
Step 4-The smallest petal should be used to start making the rose. Slightly above where the twine begins, attach the petal by stitching along the bottom FIG. 4. Place the other petals in order according to size from smallest to largest turning the center in a clockwise position when each petal is added. This is done until a rose is formed.
Step 5-When the rose is satisfactorily formed, the leaves are added.
Step 6-Attach the leaves to the rose by sewing them to the middle section FIG. 9.
Once the leaves have been added it is time to complete the pillow by adding the bottom 22.
Step 7-Bottom 22 should be placed in the center underside of the pillow FIG. 10. Sew into place using an overstitch 24, FIG. 20.
An example of a three-dimensional, multi-petal rose pillow 25, fabricated in accordance with the method of this invention is illustrated in FIG. 12.
The basic principle used in making a three-dimensional, multi-petal flower shaped pillow in the form of a daisy is as follows:
Step 1-Petals 30, leaves 10, center 31, and bottom 32 are cut out. The size of the flower being made is totally up to the discretion of the individual making the pillow.
Step 2-Sew and stuff center 31 and bottom, 32.
Step 3-The topside of center 31 is covered in half inch yellow pom-poms 33. This gives the effect of a daisy middle. This effect is achieved by running a regular sewing needle 34, threaded with yellow 35 thread through the middle of pom-pom 33 and attaching it to the fabric 31. The fabric 31, to which the pom-poms 33 are attached, should be covered leaving a space of about one half inch around the edge FIG. 15. Now the two pieces that make the center can be sewn together.
With pom-poms 33 turned on the inside FIG. 16, sew the two pieces of fabric together FIG. 17(b), leaving a opening for stuffing FIG. 17(a). Turn the fabric so that the pom-poms 33 are on top. Stuff the center and close by sewing FIG. 17(c).
Step 4-The petals are sewn and stuffed. Two seams 36, are sewn down the middle of each petal 30, a few inches from the bottom of the petal FIG. 18.
Step 5-Two leaves 10 are shaped according to the shape of the leaves on a daisy. The leaves are fashioned in the same manner as described previously.
Step 6-Arrange the petals in a circle FIG. 19. Make sure that the bottoms of petals are abutting FIG. 19. Tack the ends of each petal to the one next to it so that they remain in place FIG. 20.
Step 7-Attach leaves 10 under the petals so that they remain in place also FIG. 21.
Step 8-Place bottom 32, down and place petals 30, and leaves10, on top, making sure the bottom is centered.
Step 9-Place center 31, on top of petals 30, making sure that top center 31 and bottom 32, are aligned. From top to bottom, sew through center, petals, leaves and bottom FIG. 22.
An example of a completed three-dimensional multi-petal daisy pillow fabricated in accordance with the method of this invention is illustrated in FIG. 23.
The basic principle used in making a three-dimensional multi-petal flower shaped pillow in the form of a dogwood is as follows:
Step 1-With all the necessary pieces cut out, sew petals 40, leaves10, and bottom 41, leaving an opening for stuffing.
Step 2-To make the middle, measure and cut tan cord 42, into sections of approximately three and a half inches. Place clear tape 45, around marked off sections. Place the tape half way of each marked off section. Cut the cord on the marked and taped section FIG. 25. This will keep the cord from fraying.
Step 3-Using a hot glue gun or other appropriate means, attach a pom-pom 43 on one end of each cut section of cord 42.
Remove tape 45, from the section of the cord under the pom-pom 43.
Attach all the pieces of cord together, to form a bundle 44.
Wrap another piece of cord 42, securely around the bundle 44, to secure it
Step 4-With ends of petals 40, together, from the back side, sew petals 40, together with seams of about one and a half to two inches to form a funnel FIG. 29.
Step 5-Two leaves 10, are fashioned in the same manner as described previously, and are attached on either side of the petals 40, on the back side FIG. 30.
Step 6-With flower turned right side up, insert bundle of cord 44 into the middle FIG. 31.
Secure middle to petals by sewing around the outside of the petals to the middle FIG. 32.
Step 7-Wrap cord 42 around bottom of petals 40, center 44 and leaves l0,securing them tightly in place FIG. 33.
Step 8-Attach bottom 41, by centering it and sewing it into place FIG. 34.
An example of a three-dimensional multi-petal dogwood pillow fabricated in accordance with the method of this invention is illustrated in FIG. 36.
The basic principle used in making a three-dimensional multi-petal flower shaped pillow in the form of a sunflower is as follows:
Step 1-With all the necessary pieces cut out, sew petals 50, leaves 10, center 51 and bottom 52, leaving an opening for stuffing.
Step 2-The center is covered with brown pom-poms 53, FIGS. 38-39. This is done by threading a regular sewing needle 54, with brown thread 55, and pushing the needle through the fabric and pom-pom 53, once and back through the pom-pom again and through the fabric. Secure the pom-pom 53, into place by tying a knot at the bottom of the fabric. Repeat this process until the entire center is covered, leaving a space of about one half inch around the edge of the center.
Step 3-With pom-poms 53, on the inside, sew the two pieces of fabric together FIG. 40.
Turn, stuff and close.
Step 4-Arrange petals in order according to the shape of a sunflower. Tack the petals 50, together at the bottom to hold them into place FIG. 41.
Step 5-Two leaves 10 are fashioned in the same manner as described previously, and are positioned under the petals and sewn into place FIG. 42.
Step 6-Place bottom 52, under leaves 10, and petals 50, and place center 51 on petals making sure that top51 and bottom 52, are even with one another.
Step 7-Stitch from top to bottom all the way around the middle, making sure top, petals, leaves and bottom are being sewn together FIG. 43.
Step 8-In the very center of the bottom middle, with needle 54, threaded and knot tied in the thread, go up to the top middle and back through to the bottom and pull the thread tightly and secure it to put a dip in the middle of the flower FIG. 44.
An example of a three-dimensional multi-petal sunflower pillow fabricated in accordance with the method of this invention is illustrated in FIG. 45.
The basic principle used in making a three-dimensional multi-petal flower shaped pillow in the form of a poinsettia is as follows:
Step 1-Cut out petals 60, leaves 10 and bottom 63. Sew and stuff.
Step 2-Veins 13 on the petals should be sewn to simulate the veins on a poinsettia FIG. 47.
Step 3-Mark green cord 61 into sections of about three and a half inches.
Step 4-Wrap clear tape 66, around the middle of each marked section FIG. 48. Cut in the middle of each piece of tape. This will keep the cord from fraying at the ends.
Step 5-Using a hot glue gun or other appropriate means, glue a green pom-pom 62 on one end of each cut piece of cord. On each green pom-pom 62, glue several smaller yellow pom-poms 64, about one half the size of the green pom-poms FIG. 50.
Step 6-Remove tape from under the pom-pom.
Step 7-Attach all the cut pieces of cord 61, together to form a bundle 65.
Wrap the bundle of cord 65, together with another piece of cord 61, to secure it FIG. 52.
Step 8-Place petals accordingly to form a poinsettia FIG. 53.
Step 9-Tack ends together to hold into place.
Step 10-Two leaves 10 are fashioned in the same manner as described previously, and are attached to the bottom of petals 60 to secure them into place by tacking them to the petals FIG. 54.
Step 11-Place bundle of cord 65, in middle of petals 60 FIG. 55. Sew petals 60, to bundle 65 FIG. 56. Using cord 61, tightly wrap bottom of petals 60, leaves10 and cord 61 and secure FIG. 57.
Step 12-Place bottom 63 under pillow to be attached FIG. 58.
Step 13-Attach bottom 63, by sewing around the edges FIG. 59
An example of a three-dimensional multi-petal pillow in the shape of a poinsettia fabricated in accordance with the method of this invention is illustrated in FIG. 60.
The basic principle used in making a three-dimensional multi-petal flower shaped pillow in the form of a pansy is as follows:
Step 1-Cut out the necessary pieces needed to make this pillow FIG. 61.
Step 2- Attach black pom-poms 71 to the fabric by threading needle and tying a knot in the end of thread 75. From bottom 73 of the fabric 73, run the needle 74 up through pom-pom 71 and back through pom-pom 71 again and through fabric 73 FIG. 62. Secure pom-poms 71 to fabric 73 FIG. 63.
Step 3-With pom-poms 71 turned down, sew both pieces of fabric, turn and stuff FIG. 64.
Step 4-Sew, turn and stuff petals 70, and bottom.
Step 5-Tack petals 70, together at the ends to hold them into place FIG. 65. Next, using the upholstery thread 75, run a seam all the way around the bottom of petals 70, and draw the middle together FIG. 66.
Step 6-Two leaves 10, are fabricated in the same manner as described previously, and are attached to the petals 70 at the center FIG. 67.
Step 7-Align top center 73 and bottom center 72 and sew from top to bottom making sure that all pieces are being sewn together FIG. 68.
An example of a three-dimensional multi-petal pillow in the shape of a pansy fabricated in accordance with the method of this invention is illustrated in FIG. 69.
The basic principle used in making a three-dimensional multi-petal flower shaped pillow in the form of a magnolia is as follows:
Step 1-With necessary pieces cut out FIG. 70, sew and stuff bottom 72, petals 73, center 74 and leaves 10.
Step 2- Mark brown cord 75 into sections of about three inches. Wrap clear tape 76 around each marked section making sure the marked spot is in the middle of the tape 71.
Step 3-Cut cord 75 on the marked spot FIG. 72. This will keep the cord from fraying.
Step 4-Using a hot glue gun or other appropriate means, attach a brown pom-pom 77 on one taped end of each cut section 75 FIG. 73. Remove the tape under the pom-pom.
Step 5-Sew all the pieces of cut cord 75 with pom-poms 77 attached to center 74 FIG. 74. Make sure the cord is sewn all the way around the center.
Step 6-Start attaching petals 73 to center 74 by sewing them on one at a time FIG. 75.
The petals are arranged to simulate the petals of a magnolia blossom.
Step 7-Two leaves 10 are fabricated in the same manner as described previously, and are attached to either side under petals 73 FIG. 76.
Step 8-Attach bottom to leaves and petals by sewing it on FIG. 77.
An example of a three-dimensional multi-petal pillow in the shape of a magnolia, fabricated in accordance with the method of this invention is illustrated in FIG. 78.
It will be further understood that the method of this invention is not to be limited to the precise form disclosed in the preferred embodiments, but may be modified without departing from the scope of the invention as defined in the appended claims.

PUM

no PUM

Description & Claims & Application Information

We can also present the details of the Description, Claims and Application information to help users get a comprehensive understanding of the technical details of the patent, such as background art, summary of invention, brief description of drawings, description of embodiments, and other original content. On the other hand, users can also determine the specific scope of protection of the technology through the list of claims; as well as understand the changes in the life cycle of the technology with the presentation of the patent timeline. Login to view more.
Why Eureka
Try Eureka