Shock absorber spring seat spiral lift detection measuring tool
A spring seat and shock absorber technology, which is applied to measuring devices, mechanical measuring devices, instruments, etc., can solve the problems that the spring seat cannot be inspected online and in batches, the measurement is inaccurate, and the spring seat is not easy to locate. Inspection and batch inspection, solve difficult positioning, easy to use effect
- Summary
- Abstract
- Description
- Claims
- Application Information
AI Technical Summary
Problems solved by technology
Method used
Image
Examples
Embodiment 1
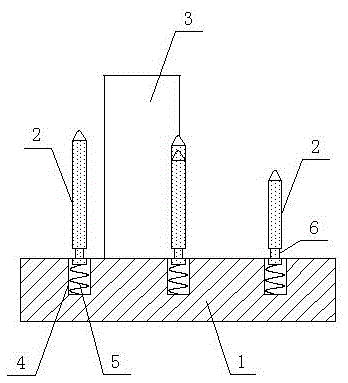
[0021] Example one: such as image 3 As shown, a shock absorber spring seat spiral lift detection measuring tool, including a base 1, the base 1 is provided with a standard seat 3 and a plurality of up and down telescopic measuring columns 2, the standard seat 3 is in line with the spring seat hole Adapted fixed column, the measuring column 2 is connected to the base 1 through the spring 5, the base 1 is provided with a spring hole 4, the spring 5 is located in the spring hole 4, the elastic force of the spring 5 is greater than the weight of the spring seat, the upper end of the spring 5 and the measurement The column 2 is connected, and its lower end is connected with the spring hole 4 of the base 1.
[0022] The present invention determines the height dimension of each measuring column 2 according to the relative positional distance of each lifting point of the spring seat, that is, the surface connected by the apex of each measuring column 2 is the spiral lift surface of the s...
Embodiment 2
[0023] Embodiment two: such as Figure 4 As shown, the measuring column 2 in this embodiment is composed of an outer casing 21 and a telescopic column 22 inside the casing 21. The casing 21 is fixed to the base 1, and the telescopic column 22 is connected to the casing 21 through a spring 5. , The elastic force of the spring 5 is greater than the weight of the spring seat. The upper end of the spring 5 is connected to the measuring column 2, and the lower end is connected to the sleeve 21. The lower tolerance position of the tolerance zone 6 on the side wall of the measuring column 2 is flush with the upper surface of the sleeve 21 . The rest of the structure and method of use in this embodiment are the same as those in the first embodiment. When testing, make each measuring column 2 just contact the spring seat. At this time, if the upper surface of the casing 21 is within the tolerance zone 6 of the measuring column 2, it is determined If it is qualified, it is judged as unqu...
Embodiment 3
[0024] Embodiment three: such as Figure 5 As shown, the difference from the first embodiment is that this embodiment is provided with a measuring seat above the base 1, the standard seat 3 and the measuring column 2 both pass through the measuring seat, and the measuring column 2 can be up and down relative to the measuring seat. Telescopic, a backing plate 7 is provided between the measuring seat and the base 1, and they are fixed together by screws 8 passing through the base 1, the backing plate 7 and the measuring seat in turn. The lower tolerance position of the tolerance zone 6 of the side wall of the measuring column 2 is consistent with The upper surface of the measuring seat is flush, and a stop step 9 is also provided on the part of the measuring column 2 below the measuring seat, so as to ensure that the extended height of the measuring column 2 remains unchanged. The method of use in this embodiment is the same as that of the previous two embodiments. During testing...
PUM
 Abstract
Description
Claims
Application Information
 - R&D
- Intellectual Property
- Life Sciences
- Materials
- Tech Scout
- Unparalleled Data Quality
- Higher Quality Content
- 60% Fewer Hallucinations
Browse by: Latest US Patents, China's latest patents, Technical Efficacy Thesaurus, Application Domain, Technology Topic, Popular Technical Reports.
© 2025 PatSnap. All rights reserved.Legal|Privacy policy|Modern Slavery Act Transparency Statement|Sitemap|About US| Contact US: help@patsnap.com


