Method and device for dynamic extensometer in mechanically fixed high temperature fatigue test
A fatigue test and extensometer technology, applied in the direction of measuring devices, instruments, scientific instruments, etc., can solve the problems that the high-temperature corrosion morphology of the sample surface cannot be observed, the accuracy of high-temperature fatigue test results is affected, and the use temperature has certain requirements. , to achieve the effect of good plasticity, low cost and low price
- Summary
- Abstract
- Description
- Claims
- Application Information
AI Technical Summary
Problems solved by technology
Method used
Image
Examples
Embodiment 1
[0040] High temperature fatigue test with strain control mode, the radius R of the parallel section of the fatigue sample is 5mm, and the gauge length L of the dynamic extensometer for measuring the deformation of the fatigue sample 4 is 25mm.
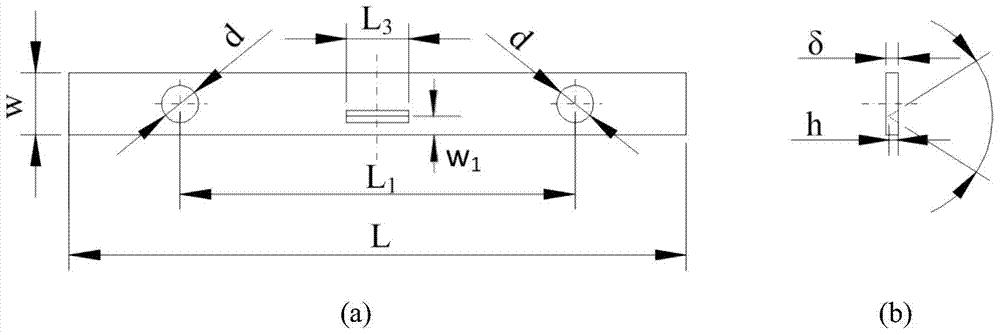
[0041] 1) Select a thin stainless steel plate with a thickness of δ=0.5mm, and symmetrically process the diameter d=3mm on the thin plate, and the hole distance L 1 = Two screw holes of 31.4mm;
[0042] 2) Using wire cutting technology, process the thin plate in step 1 into a rectangle with a width of W=5mm and a length of L=50mm, and the center of symmetry of the rectangle coincides with the center of symmetry of the two screw holes, as figure 1 shown, and grind the roughness of one of the two surfaces of the thin plate to Ra0.2 with a length of 50mm and a width of 5mm;
[0043] 3) Fit the surface of the polished thin plate to the surface of the sample, take the cylinder in the parallel section of the fatigue sample as the standard,...
Embodiment 2
[0049] High-temperature fatigue test under complex load with strain-stress compound control method, the radius R of the parallel section of the fatigue sample is 3 mm, and the gauge length L of the dynamic extensometer for measuring the deformation of the fatigue sample 4 is 12.5mm.
[0050] 1) Select a thin stainless steel plate with a thickness of δ=0.5mm, and symmetrically process the diameter d=2.5mm on the thin plate, and the hole distance L 1 = Two screw holes of 18.8mm;
[0051] 2) Using wire cutting technology, process the thin plate in step 1 into a rectangle with a width of W=4mm and a length of L=37mm. The center of symmetry of the rectangle coincides with the center of symmetry of the two screw holes, as figure 1 shown, and grind the roughness of one of the two surfaces of the thin plate with a length of 37mm and a width of 4mm to Ra0.2;
[0052] 3) Fit the surface of the polished thin plate to the surface of the sample, take the cylinder in the parallel section ...
PUM
| Property | Measurement | Unit |
|---|---|---|
| width | aaaaa | aaaaa |
| thickness | aaaaa | aaaaa |
| thickness | aaaaa | aaaaa |
Abstract
Description
Claims
Application Information


