Measuring method of Vickers hardness of TFT liquid crystal glass substrate
A technology of liquid crystal glass substrate and Vickers hardness, which is applied in the direction of testing material hardness, measuring devices, strength characteristics, etc., can solve problems such as unreachable, achieve the effect of eliminating scratches and improving the yield rate
- Summary
- Abstract
- Description
- Claims
- Application Information
AI Technical Summary
Problems solved by technology
Method used
Image
Examples
Embodiment 1
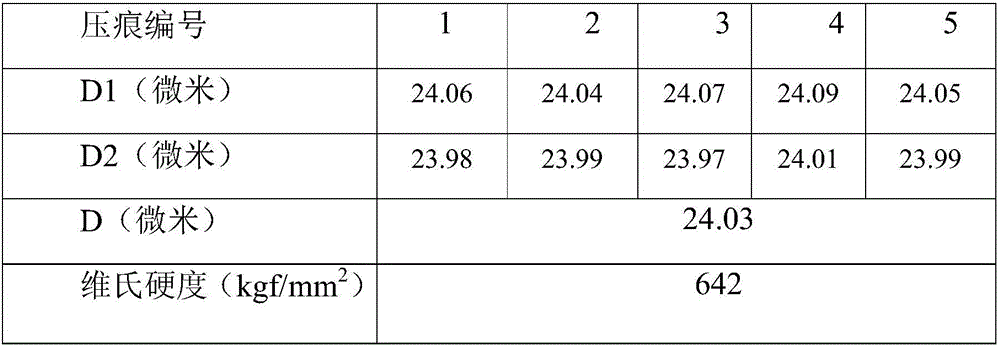
[0042] The thickness of the TFT liquid crystal glass substrate is 0.3mm, and it is cut into a square glass sheet with a side length of 10mm; the number of measurements in the Vickers hardness tester is 5 times, the measurement load is 200g, and the holding time is 15s; The carbon film spraying time of each indentation in the instrument is 10 minutes; under the magnification of 1500, observe the lengths of the two diagonal lines of each indentation with an electron microscope, and obtain the length values of 5 groups of diagonal lines and calculate The average value of the diagonal length and the Vickers hardness value are shown in Table 1.
Embodiment 2
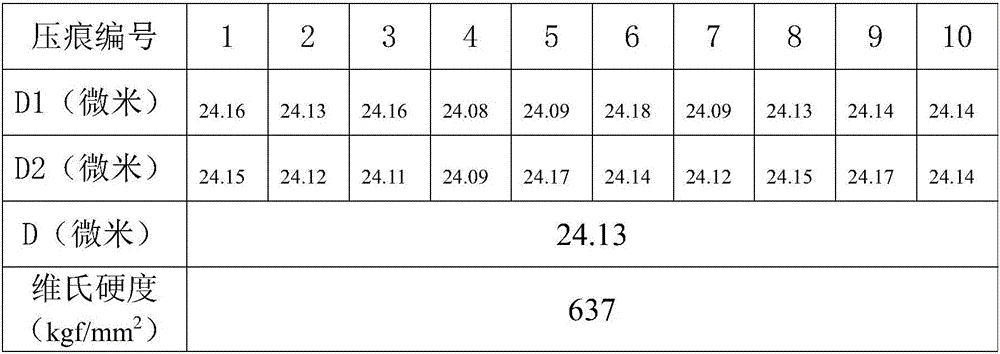
[0044] The thickness of the TFT liquid crystal glass substrate is 0.7mm, and it is cut into a square glass sheet with a side length of 25mm; the number of measurements in the Vickers hardness tester is 10 times, the measurement load is 200g, and the holding time is 30s; The carbon film spraying time of each indentation in the instrument is 15 minutes; under the magnification of 2000, observe the lengths of the two diagonal lines of each indentation with an electron microscope, and obtain the length values of 10 groups of diagonal lines and calculate The average value of the diagonal length and the Vickers hardness value are shown in Table 2.
Embodiment 3
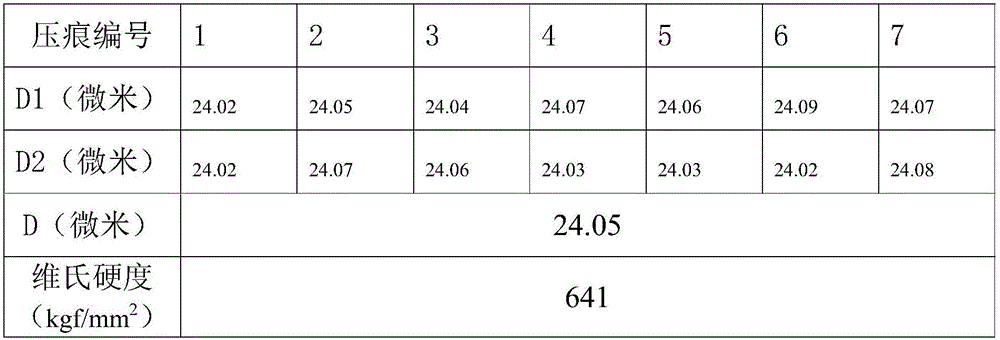
[0046] The thickness of the TFT liquid crystal glass substrate is 0.5mm, and it is cut into a square glass sheet with a side length of 18mm; the number of measurements in the Vickers hardness tester is 7 times, the measurement load is 200g, and the holding time is 22s; The carbon film spraying time of each indentation in the instrument is 12 minutes; under the magnification of 1700, the lengths of the two diagonal lines of each indentation are observed with an electron microscope, and the length values of 7 sets of diagonal lines are obtained and calculated. The average value of the diagonal length and the Vickers hardness value are shown in Table 3.
[0047] Table 1
[0048]
[0049] Table 2
[0050]
[0051] table 3
[0052]
PUM
| Property | Measurement | Unit |
|---|---|---|
| Side length | aaaaa | aaaaa |
| Thickness | aaaaa | aaaaa |
| Vickers hardness | aaaaa | aaaaa |
Abstract
Description
Claims
Application Information


