Full-automatic complete shoe tree three-dimensional data measuring device and method
A technology of three-dimensional data and measuring devices, which is applied to measuring devices for feet or shoe lasts, measuring devices, optical devices, etc., to achieve high resolution and accuracy, reduce data measurement time, and fast measurement time
- Summary
- Abstract
- Description
- Claims
- Application Information
AI Technical Summary
Problems solved by technology
Method used
Image
Examples
specific Embodiment approach 1
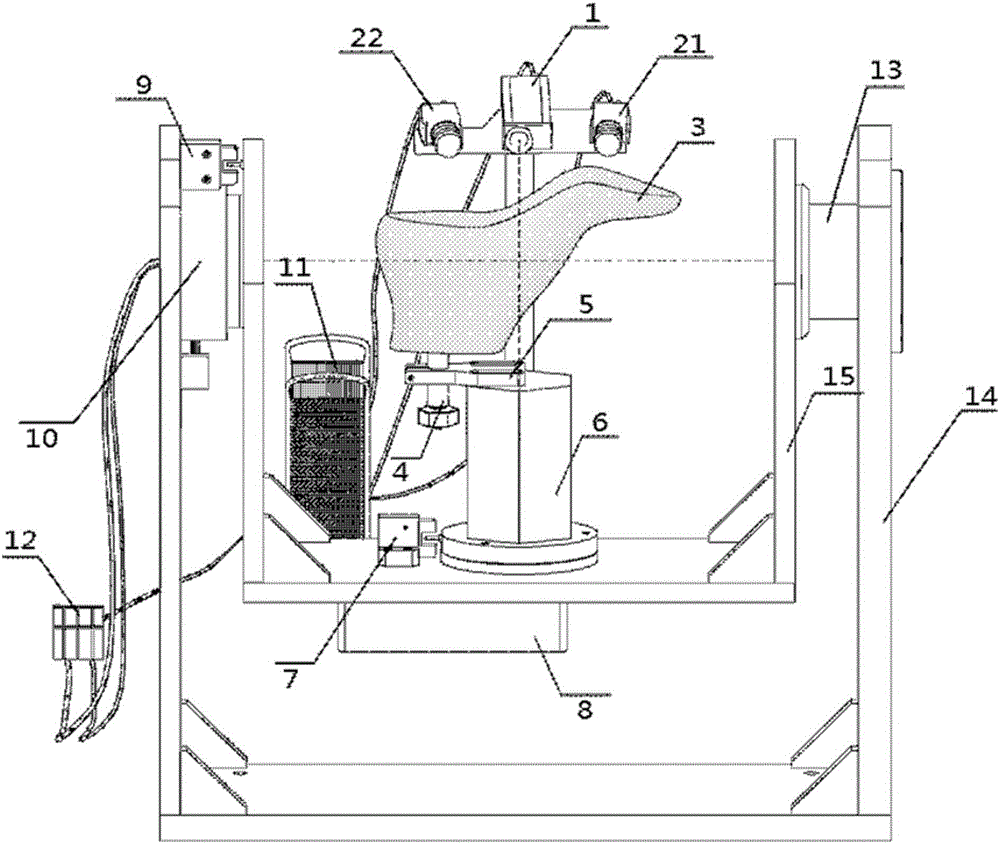
[0101] Specific implementation mode one: combine figure 1 and figure 2 Describe this embodiment in detail. The fully automatic and complete shoe last three-dimensional data measurement device described in this embodiment includes a DLP projector 1, a first industrial camera 21, a second industrial camera 22, a shoe last fixture 4, and a shoe last fixture fixing seat 5. Calibration cylinder 6, inner ring rotation limit switch 7, inner ring worm gear mechanism 8, inner ring swing limit switch 9, outer ring worm gear mechanism 10, PC 11, control box 12, bearing 13, outer Ring frame 14 and inner ring frame 15;
[0102] DLP projector 1 is used to project raster images, and two industrial cameras are used to collect raster images;
[0103] The shoe last fixture 4 is used to clamp the shoe last 3 to be tested. The shoe last fixture 4 is tightly connected with the top of the calibration cylinder 6 through the shoe last fixture holder 5, and the bottom end of the calibration cylinde...
specific Embodiment approach 2
[0108] Specific implementation mode two: combination figure 2 and image 3 Describe this embodiment in detail. This embodiment is a further description of the fully automatic three-dimensional data measuring device for a complete shoe last described in Embodiment 1. In this embodiment, the shoe last fixture 4 includes a sleeve 41 and an internal polished rod 42. and fastening nut 43;
[0109] The outer wall of the sleeve 41 is provided with threads, and the sleeve 41 is tightly sleeved outside the inner polished rod 42,
[0110] One end of the sleeve 41 is a cone-shaped tube, and the end face is the bottom surface of the cone. The cone-shaped tube is provided with a strip-shaped gap. There are external threads, and the fastening nut 43 is threadedly connected with the internal polished rod 42 .
[0111] When rotating the fastening nut 43, such as figure 2 As shown, the inner polished rod 42 moves to the right and makes the radius of the left end of the threaded sleeve 41...
specific Embodiment approach 3
[0112] Specific implementation mode three: combination Figure 4 Describe this embodiment in detail. This embodiment is a further description of the fully automatic three-dimensional data measuring device for a complete shoe last described in Embodiment 2. In this embodiment, the shoe last fixture holder 5 includes a rectangular groove 51, a screw thread Holes 52 and fastening screws 53;
[0113] One end of the shoe last fixture fixing seat 5 is provided with a rectangular groove 51, the sleeve 41 is threadedly connected with the shoe last fixture fixing seat 5 through a threaded hole 52, and the other end of the shoe last fixture fixing seat 5 is provided with a groove communicating with the threaded hole 52, A fastening screw 53 passes through the slot for fastening the sleeve 41 .
[0114] The screw passes through the rectangular groove 51 and connects with the four threaded holes on the upper part of the calibration cylinder 6, and through its rectangular groove structure...
PUM
 Abstract
Description
Claims
Application Information


