Small-size two-dimensional code laser marking method for aluminum alloy surface
A technology of aluminum alloy surface and laser marking, applied in laser welding equipment, metal processing equipment, welding equipment, etc., can solve the problems of separation of product and unique identification, difficulty in guaranteeing the quality of two-dimensional code, and difficulty in implementing part binding , to achieve the effects of strong practicability, improved reading quality and good repeatability
- Summary
- Abstract
- Description
- Claims
- Application Information
AI Technical Summary
Problems solved by technology
Method used
Image
Examples
Embodiment 1
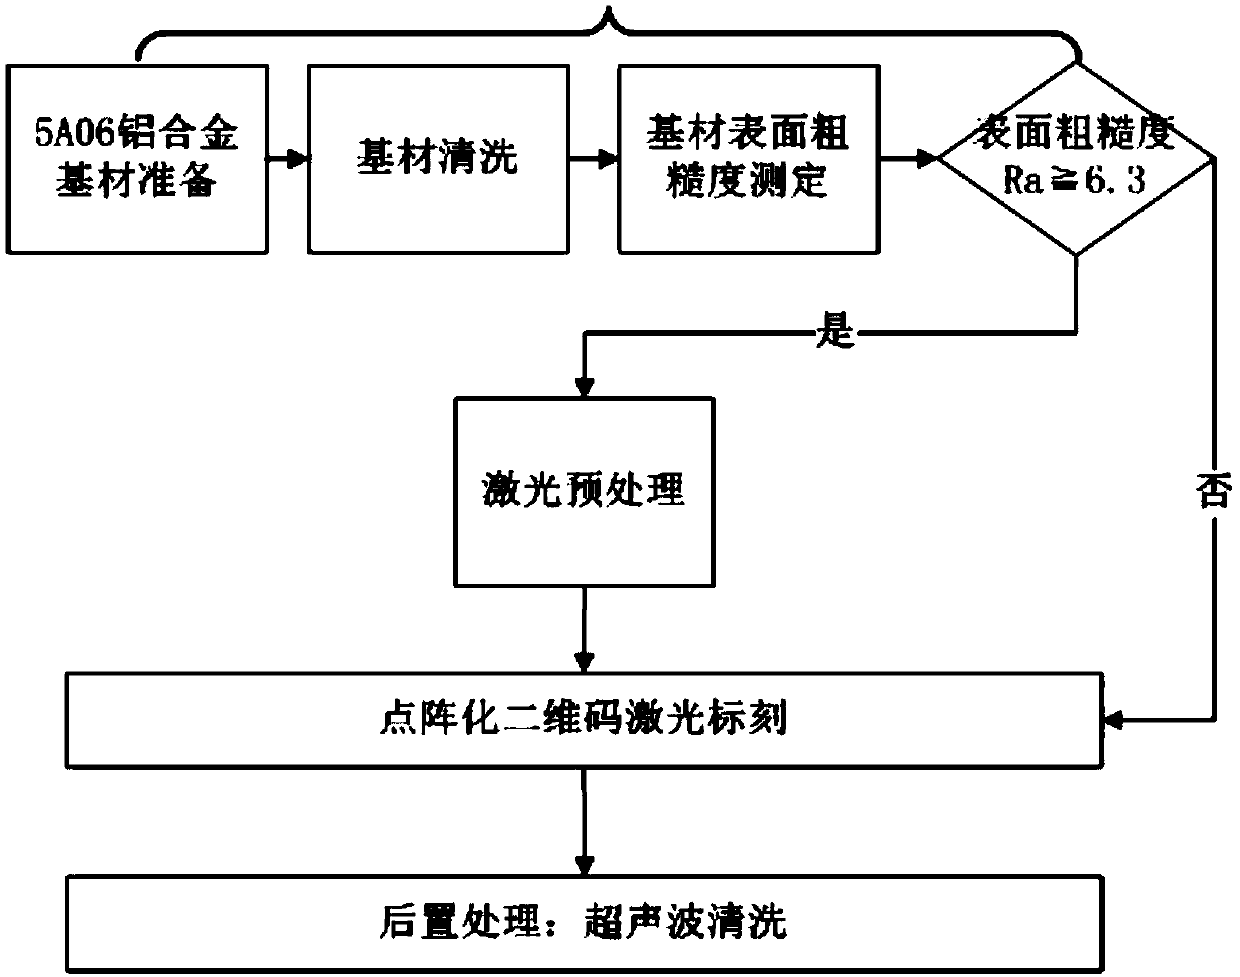
[0075] Step 1: Substrate preparation and pretreatment:
[0076] Step 1.1: prepare a 5A06 aluminum alloy base material, a thin plate with a base material thickness of 5 mm;
[0077] Step 1.2: Cleaning and air-drying: Ultrasonic cleaning is performed on the sample in step 1.1 in acetone for 2 minutes to remove possible oil and impurities on the surface of the material, and then air-dried to prepare for later pretreatment and QR code marking;
[0078] Step 1.3: Test the surface roughness of the aluminum alloy to be marked, and the result shows that Ra=1.6, so it is the base material of Group A, so go directly to step 2;
[0079] Step 2: Laser marking two-dimensional code: Use the same laser marking equipment as in step 1. After the focus adjustment is completed, mark a square with a size of 0.8×0.8mm directly on the surface of the thin plate substrate (for group A substrate). 2 The DM code (the code word is "123456"), the marking method is dot matrix marking; the laser marking p...
Embodiment 2
[0088] Step 1: Substrate preparation and pretreatment:
[0089] Step 1.1: prepare a 5A06 aluminum alloy substrate, a thin plate with a substrate thickness of about 3 mm;
[0090] Step 1.2: Cleaning and air-drying: Ultrasonic cleaning is performed on the sample in step 1.1 in acetone for 5 minutes to remove possible oil and impurities on the surface of the material, and then air-dried to prepare for later pretreatment and QR code marking;
[0091] Step 1.3: Test the surface roughness of the aluminum alloy to be marked, and the result shows that Ra=6.3, and the texture is obvious, so it is the base material of group B and enters step 1.4;
[0092] Step 1.4: Two-dimensional code marking pretreatment, prepare a laser action bottom layer by pre-scanning; use fiber laser marking machine, after focusing, mark a size of 3×3mm 2 square module; the laser marking process parameters used are: laser power 3W, marking speed 200mm / s, Q frequency 50KH, module scanning filling line spacing 0.1...
PUM
| Property | Measurement | Unit |
|---|---|---|
| thickness | aaaaa | aaaaa |
Abstract
Description
Claims
Application Information


