Method for nondestructive evaluation of residual stress of aluminum alloy pre-stretched plate by utilizing ultrasonic wave
A pre-stretched plate and residual stress technology, which is applied in the use of sound waves/ultrasonic waves/infrasonic waves to analyze solids, measure forces, instruments, etc., can solve the problem that the detection accuracy is greatly affected by surface roughness, high cost, and consumes a lot of money and time and other problems, to achieve the effect of large thickness application range, improve precision and accuracy, and reduce interference
- Summary
- Abstract
- Description
- Claims
- Application Information
AI Technical Summary
Problems solved by technology
Method used
Image
Examples
Embodiment 1
[0055] The tested plate is a 7075 aluminum alloy plate with a thickness of 20mm, a width of 200mm and a length of 300mm. The residual stress test block is cut from the 7075 aluminum alloy pre-stretched plate, and the specifications are 20mm in thickness, 150mm in width and 150mm in length. The XRD ray diffraction method is used to measure the residual stress test block, and the residual stress value of the residual stress test block is measured to be 20 MPa, and is calibrated on the residual stress test block.
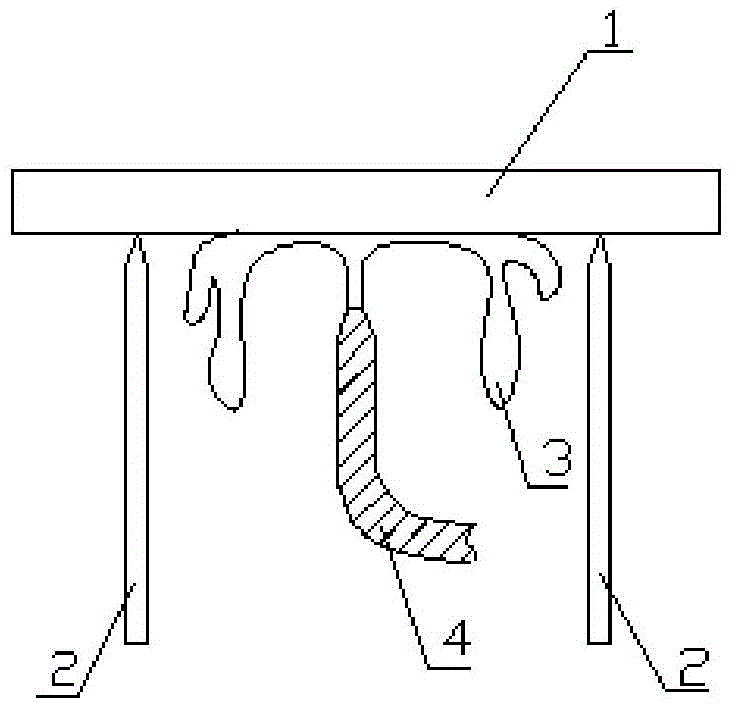
[0056] The plate to be inspected introduces residual stress manually, see figure 1 As shown, the 7075 plate 1 was placed in a heating furnace to raise the temperature to 475°C and keep it warm for 4 hours. Then the 7075 plate 1 is quickly transferred to the suspended support 2. A water pipe 4 with a nozzle is fixed at the center of the support 2. The cold water 3 is sprayed to the surface of the 7075 plate 1 through the water pipe 4, so that the 7075 plate 1 is rapi...
Embodiment 2
[0072] The tested plate is a 7050-T7451 aluminum alloy plate, and the tested 7050-T7451 aluminum alloy plate adopts a tensile stress reduction process with a stretch rate of 2.5%. The specifications are 76mm in thickness, 260mm in width, and 260mm in length. The residual stress test block is cut from the 7050-T7451 aluminum alloy plate, and the specifications are 76mm in thickness, 200mm in width and 200mm in length. The residual stress value of the residual stress test block was measured by XRD ray diffraction method to be 18MPa, and was calibrated on the residual stress test block. To measure the residual stress of the tested plate, the steps are as follows:
[0073] (1) The frequency is 15MHz, and the water immersion type ultrasonic flat probe with a diameter of 12.7mm is installed on the ultrasonic equipment, and the frequency spectrum of the ultrasonic probe at 15MHz is as follows Figure 4 shown.
[0074] (2) Calibrate on the residual stress test block. The residual str...
PUM
| Property | Measurement | Unit |
|---|---|---|
| Thickness | aaaaa | aaaaa |
| Width | aaaaa | aaaaa |
| Length | aaaaa | aaaaa |
Abstract
Description
Claims
Application Information


