Method for measuring thickness of sample on diamond anvil cell
A diamond anvil and sample thickness technology, which is applied in the field of physical quantity testing, can solve the problems of inability to obtain sample thickness, and achieve simple and effective design and processing, and the effect of solving thickness measurement problems
- Summary
- Abstract
- Description
- Claims
- Application Information
AI Technical Summary
Problems solved by technology
Method used
Image
Examples
Embodiment 1
[0039] In conjunction with accompanying drawing, further illustrate the diamond of the present invention to the measuring method of sample thickness on the anvil
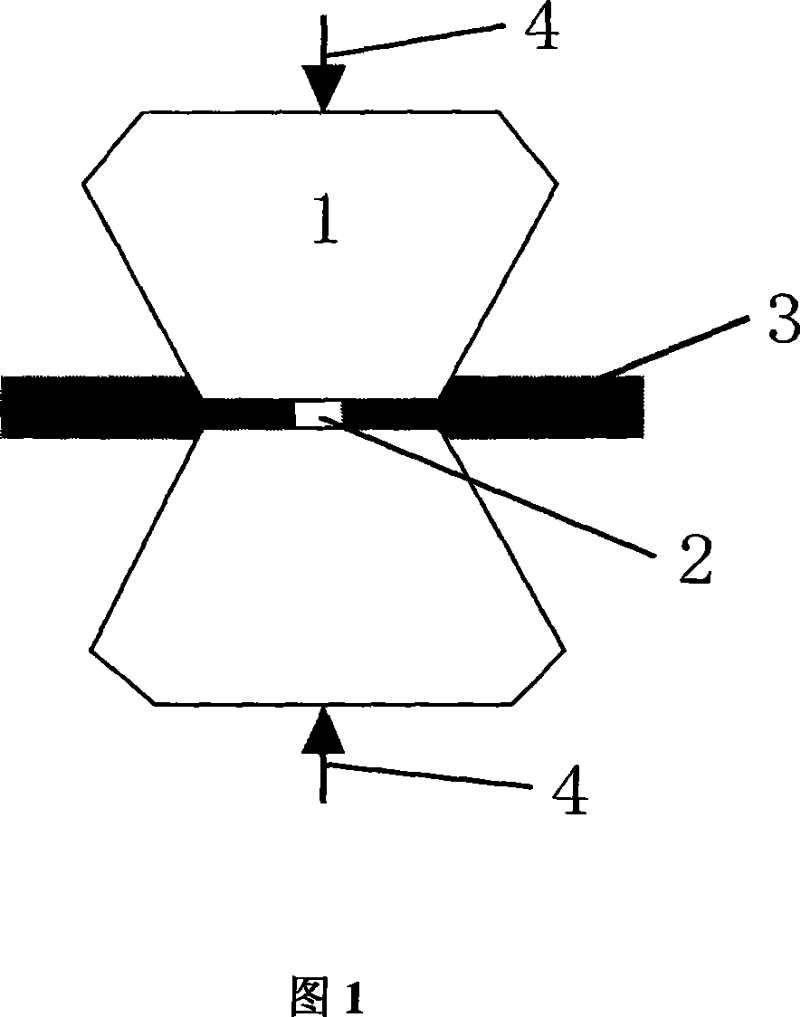
[0040] In Figure 1, 1 is the diamond on the anvil, which is divided into upper and lower two, 2 is the sample chamber, 3 is the gasket, generally made of T-301 stainless steel, and 4 is the measuring probe, which can be hard alloy The material probe is installed on the bayonet of the micrometer. When measuring, the measuring probe directly touches the upper and lower bottom surfaces of the diamond counter-anvil.
[0041] In the experiment, a diamond counter-anvil with an anvil surface of 300 microns was used. The diamond 1 has a lead angle of 8.5 degrees. The total height H of the two diamonds 1 0 It is 4.009mm. Thickness measurements were performed on alumina samples.
[0042] The first step is to measure the height of the two diamonds on the diamond anvil under normal pressure and record it as H 0 =4.009mm; put...
Embodiment 2
[0051] In the experiment, the diamond counter-anvil of Example 1 was used to measure the thickness of the sample under any pressure for the same sample of Example 1.
[0052] The first step, with the first step of embodiment 1.
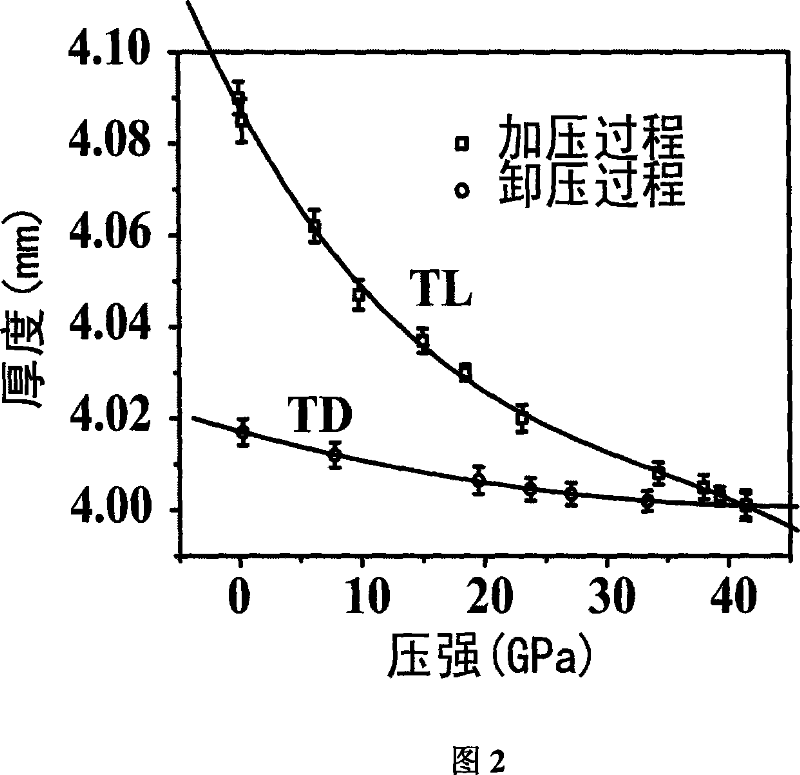
[0053] The second step is to measure a set of arbitrary pressure P and the reading T of the micrometer during the pressurization process L (P) One-to-one corresponding data, see Table 1; when the pressure reaches the maximum value of 41.43GPa, record the reading of the micrometer at this time as T L (max) = 4.001 mm.
[0054] pressure P
(GPa)
0
0.27
6.25
9.80
15.00
18.50
23.50
34.26
37.98
39.31
micrometer reading
Count T L (mm)
4.09
4.085
4.062
4.047
4.037
4.030
4.020
4.008
4.005
4.003
[0055] Step 3: Start decompression when the pressur...
Embodiment 3
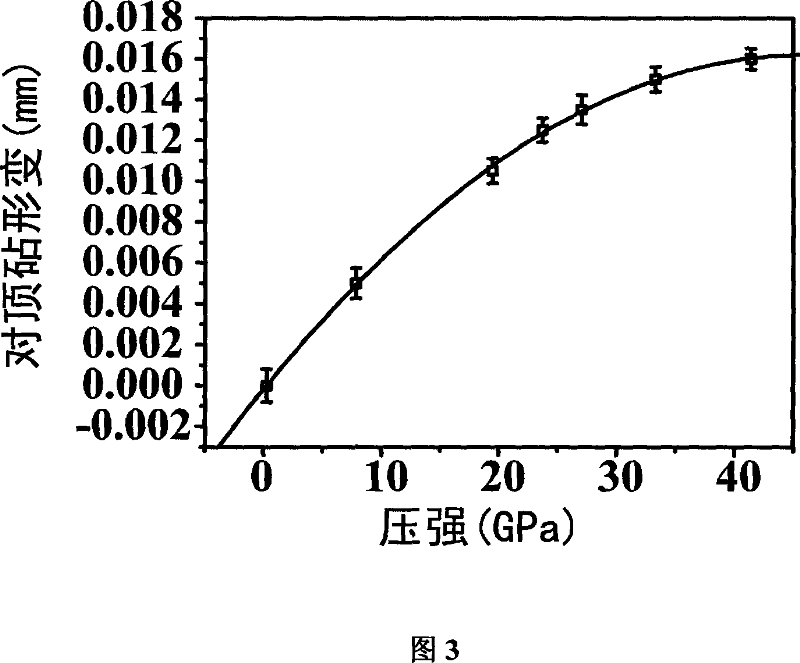
[0061] As mentioned earlier, the deformation of diamond is D P =H 0 -[T D (P)-t max ] (Formula 3), thus, the deformation D of diamond can be obtained P Along with the variation curve of pressure P, the deformation amount D of the diamond drawn by the measurement result of embodiment 2 P The change curve with pressure P is shown in Figure 3. In this way, knowing the measured thickness T at any pressure during the pressurization process L (P) and diamond row variable D P , using t(P)=T L (P)-(H 0 -D P ) (Formula 4), the sample thickness t(P) under any pressure can be obtained. The change curve of sample thickness t(P) with pressure P can be drawn. From the measurement results of Example 2, the curve of the sample thickness t(P) varying with the pressure P is shown in FIG. 4 .
[0062] In the experiment, the maximum pressure applied is 41.4GPa, under this pressure the displacement of the diamond is 16 microns, and the thickness of the sample at this time is only 8 micr...
PUM
 Abstract
Description
Claims
Application Information


