Visual inspection method for weld penetration depth

A technology of visual inspection and weld penetration, which is applied in the field of welding, can solve the problems of time-consuming, labor-intensive, time-consuming and money-wasting, achieve good economic value, and improve the overall product inspection and manufacturing efficiency.

Inactive Publication Date: 2021-06-18
CNNC JIANZHONG NUCLEAR FUEL
View PDF8 Cites 0 Cited by
  • Summary
  • Abstract
  • Description
  • Claims
  • Application Information

AI Technical Summary

Problems solved by technology

Only one metal pipe socket can be produced per shift per day, and most of the time is spent waiting for i...

Method used


Image

  • Visual inspection method for weld penetration depth
  • Visual inspection method for weld penetration depth
  • Visual inspection method for weld penetration depth

Examples


Embodiment Construction

[0027] The present invention will be further described below by means of the accompanying drawings and specific embodiments.

[0028] 1) First inspect the test panel.

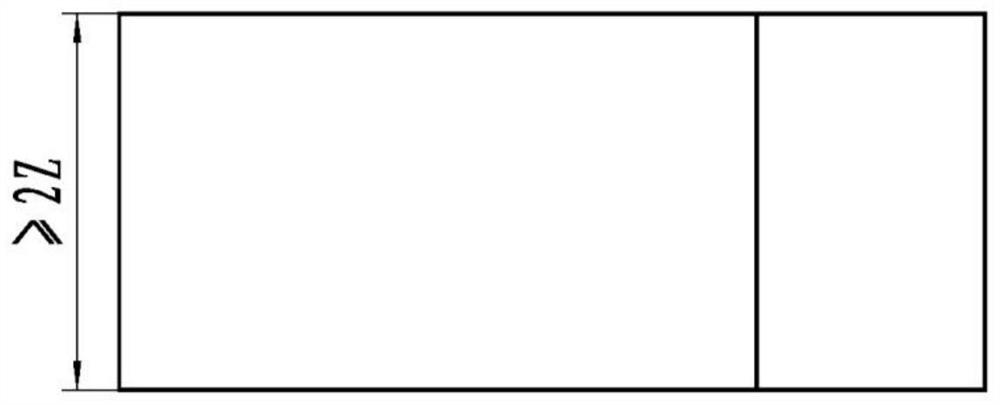
[0029] As shown in Figure 1, the test plate is a strip-shaped wedge-shaped thin plate. One end of the test plate is equal in thickness, and the thickness dimension is H. H≥the thickness of the welded joint of the product. This end of the test plate is the sample clamping part and the weld seam. The starting part; the other end of the test plate is wedge-shaped, gradually thinning along a certain angle. The angle range is 0~10°.

[0030] Determine whether the width of the test plate is greater than or equal to 2 times Z, and Z represents the width of the heat-affected zone of the weld.

[0031] If not, find the test board again, if yes, go to the next step.

[0032] 2) Determine the position of the weld seam

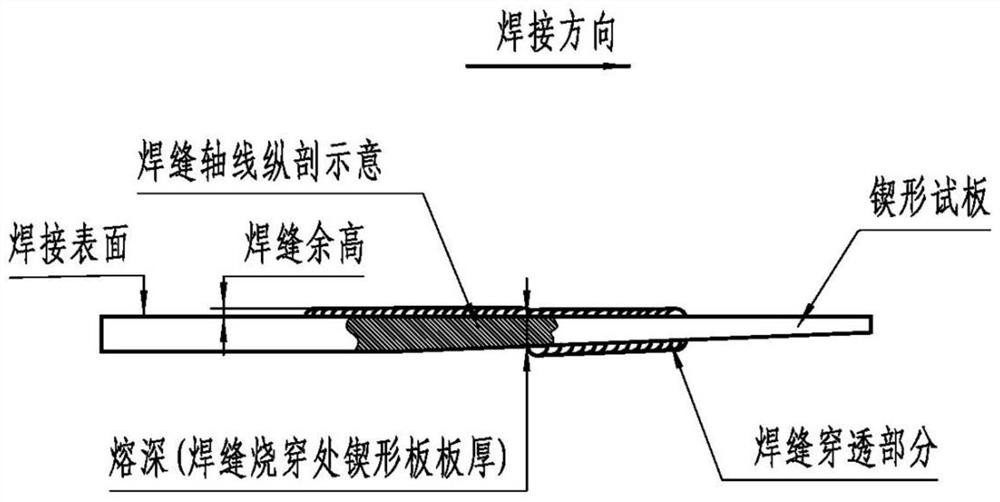
[0033] Such as figure 2 As shown, when welding, the horizontal plane (welding surface) of the tes...


PUM


Abstract

The invention belongs to a welding technology, and particularly relates to a visual inspection method for weld penetration depth. The method comprises the following steps: firstly, determining and inspecting a test plate which is a long-strip-shaped wedge-shaped thin plate, one end of the test plate is equal in thickness, the other end of the test plate is wedge-shaped, the test plate is gradually thinned along a certain angle, and determining a weld position from the equal-thickness end of the test plate and ending at the joint of the wedge-shaped plate and the equal-thickness plate; and searching the penetration position of the welding seam on the wedge-shaped plate, marking out a straight line perpendicular to the long side of the test plate at the penetration starting position of the welding seam, and measuring the plate thickness of the long side of the test sample at the marking position, namely the penetration depth value of the welding seam. By means of the inspection method, the welded sample does not need to be subjected to damage inspection, visual inspection can be achieved only through a vernier caliper, and the overall product inspection and manufacturing efficiency is improved.

Description

technical field [0001] The invention belongs to the welding technology, and in particular relates to a welding seam penetration inspection method. Background technique [0002] Both the welding process parameter test and the production process control sample of metal products need to inspect the weld strength. The original inspection method is to use X-ray non-destructive flaw detection, destructive metallographic inspection, destructive tensile test and so on. The above methods all require at least 4 hours for circulation, sample preparation, testing and reporting, and the manufacturing efficiency is very low. [0003] In the prior art, only destructive metallographic inspection or tensile test can be used for production process control samples. The process is as follows: before each production, a production process control sample is welded, and then the sample is cut or milled by machining, and then Send it to the Institute of Physical and Chemical Testing for metallogra...

Claims


Application Information

Patent Timeline
IPC IPC(8): G01N33/204G01B5/00
CPCG01N33/204G01B5/00
Inventor 秦国鹏张丽英李莎李先平盛锋尹富斌王丹李峰陈忠权李杰华谭兰衍张晨
Owner CNNC JIANZHONG NUCLEAR FUEL
Why Eureka
Try Eureka