Method for measuring uncertainty of industrial CT geometric dimension based on spherical die body
A technology for measuring uncertainty and geometric dimensions, applied to measuring devices, instruments, and using wave/particle radiation, etc., can solve problems that have not been unanimously recognized, and achieve the effect of improving measurement accuracy and reducing impact
- Summary
- Abstract
- Description
- Claims
- Application Information
AI Technical Summary
Problems solved by technology
Method used
Image
Examples
Embodiment 1
[0030] A method for measuring uncertainty of industrial CT geometric dimensions based on a spherical phantom, comprising the following steps:
[0031] S1: The ball model is sent to the metrology department for calibration and inspection before use and is used as the workpiece to be inspected, and a calibration certificate is obtained. , zirconium dioxide or stainless steel.
[0032] S2: Use industrial CT to scan and reconstruct the inspected workpiece multiple times, and the number of scans is not less than 5 times.
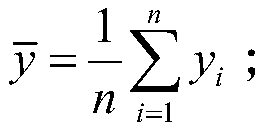
[0033] A complete industrial CT measurement process includes the following steps: First, the scanning and reconstruction of the sample, X-ray transillumination of the sample, affected by the difference in the structure and composition of the sample, resulting in different degrees of attenuation of X-rays, forming a group on the detector. Bright and dark projection related to the sample structure; the turntable rotates synchronously to collect a large number of 2...
Embodiment 2
[0045] The same parts of this embodiment and the first embodiment will not be repeated, and the differences are:
[0046] A ball model composed of two silicon nitride ceramic balls with grade G10 was selected as the research object to evaluate the uncertainty of industrial CT measurement. The advantages of choosing the silicon nitride ceramic ball group model are: high precision, high strength, high hardness, low cost, easy calibration, easy fitting and measurement, small thermal expansion coefficient, small linear attenuation coefficient, ball center distance resistance to threshold fluctuations, etc. The selected ball model (that is, the workpiece to be inspected) has passed the metrological verification of the measuring institution before the industrial CT measurement. The calibration certificate shows that the diameter of the ceramic ball is 19.05mm, the distance between the center of the ball is 38.10mm, the G10 level, the calibration test condition: temperature : 20.3°C,...
PUM
 Abstract
Description
Claims
Application Information


