Electromagnetic induction type inspection device and method

a technology of electromagnetic induction and inspection device, which is applied in the direction of measurement device, magnetic measurement, instruments, etc., can solve the problems of low sensitivity of inspection device, inability to detect inductance, and inability to discriminate the material of inspection object, etc., to achieve easy inspection or discrimination, high sensitivity, and high accuracy

Inactive Publication Date: 2010-03-04
KAISEI ENGINEER CO LTD
View PDF6 Cites 56 Cited by
  • Summary
  • Abstract
  • Description
  • Claims
  • Application Information

AI Technical Summary

Benefits of technology

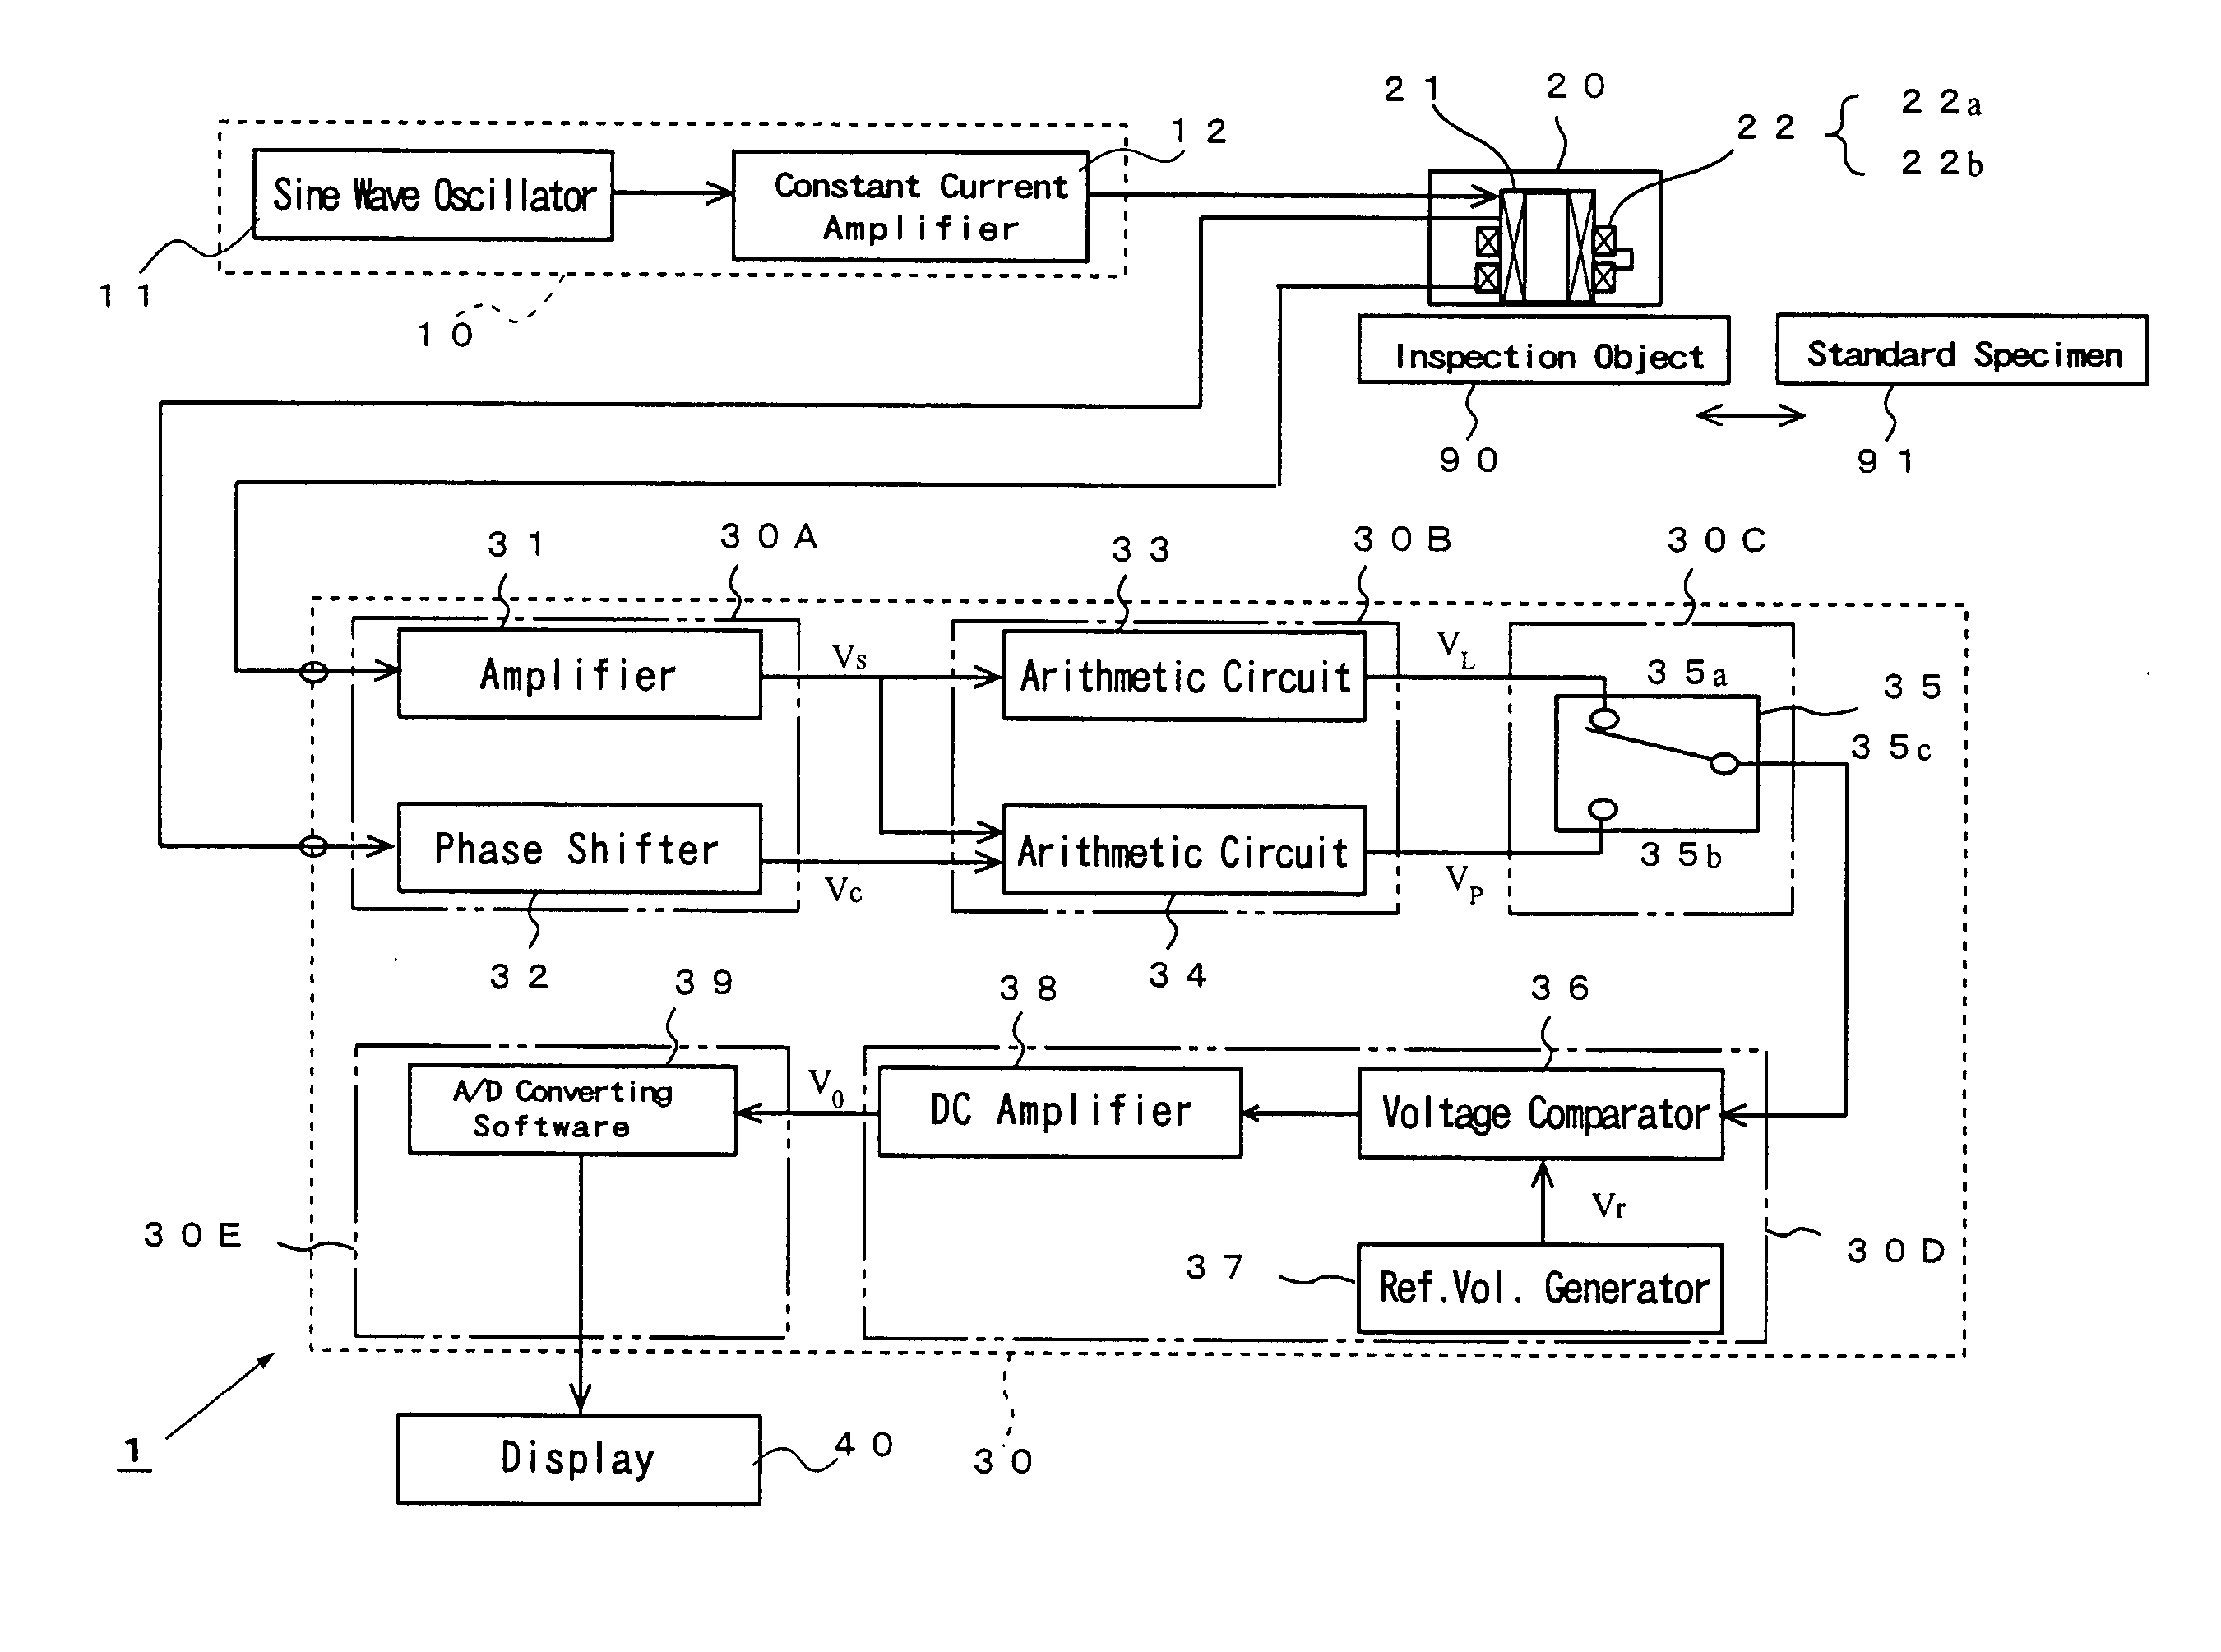
[0016]The present invention has been made to overcome conventional drawbacks and it is an object of the present invention to provide an electromagnetic induction type inspection device and method capable of inspecting and identifying or discriminating every type of object without regard to magnetic material or nonmagnetic material with high sensitivity and high accuracy
[0017]Another object of the invention is to provide an electromagnetic induction type inspection device and method capable of detecting defects in an inspection object of conductive material with high resolution.
[0027]According to the inspection method of the invention, the inspection objects of various kinds can be inspected or discriminated with ease and high accuracy by obtaining the voltage value relevant to the amplitude of the output voltage signal from the detection coil unit in the level mode and the voltage value relevant to the phase difference between the output voltage signal from the detection coil unit and the phase of the exciting voltage of the exciting coil in the phase mode, and determining the inspection object from the voltage values for the level and phase modes.

Problems solved by technology

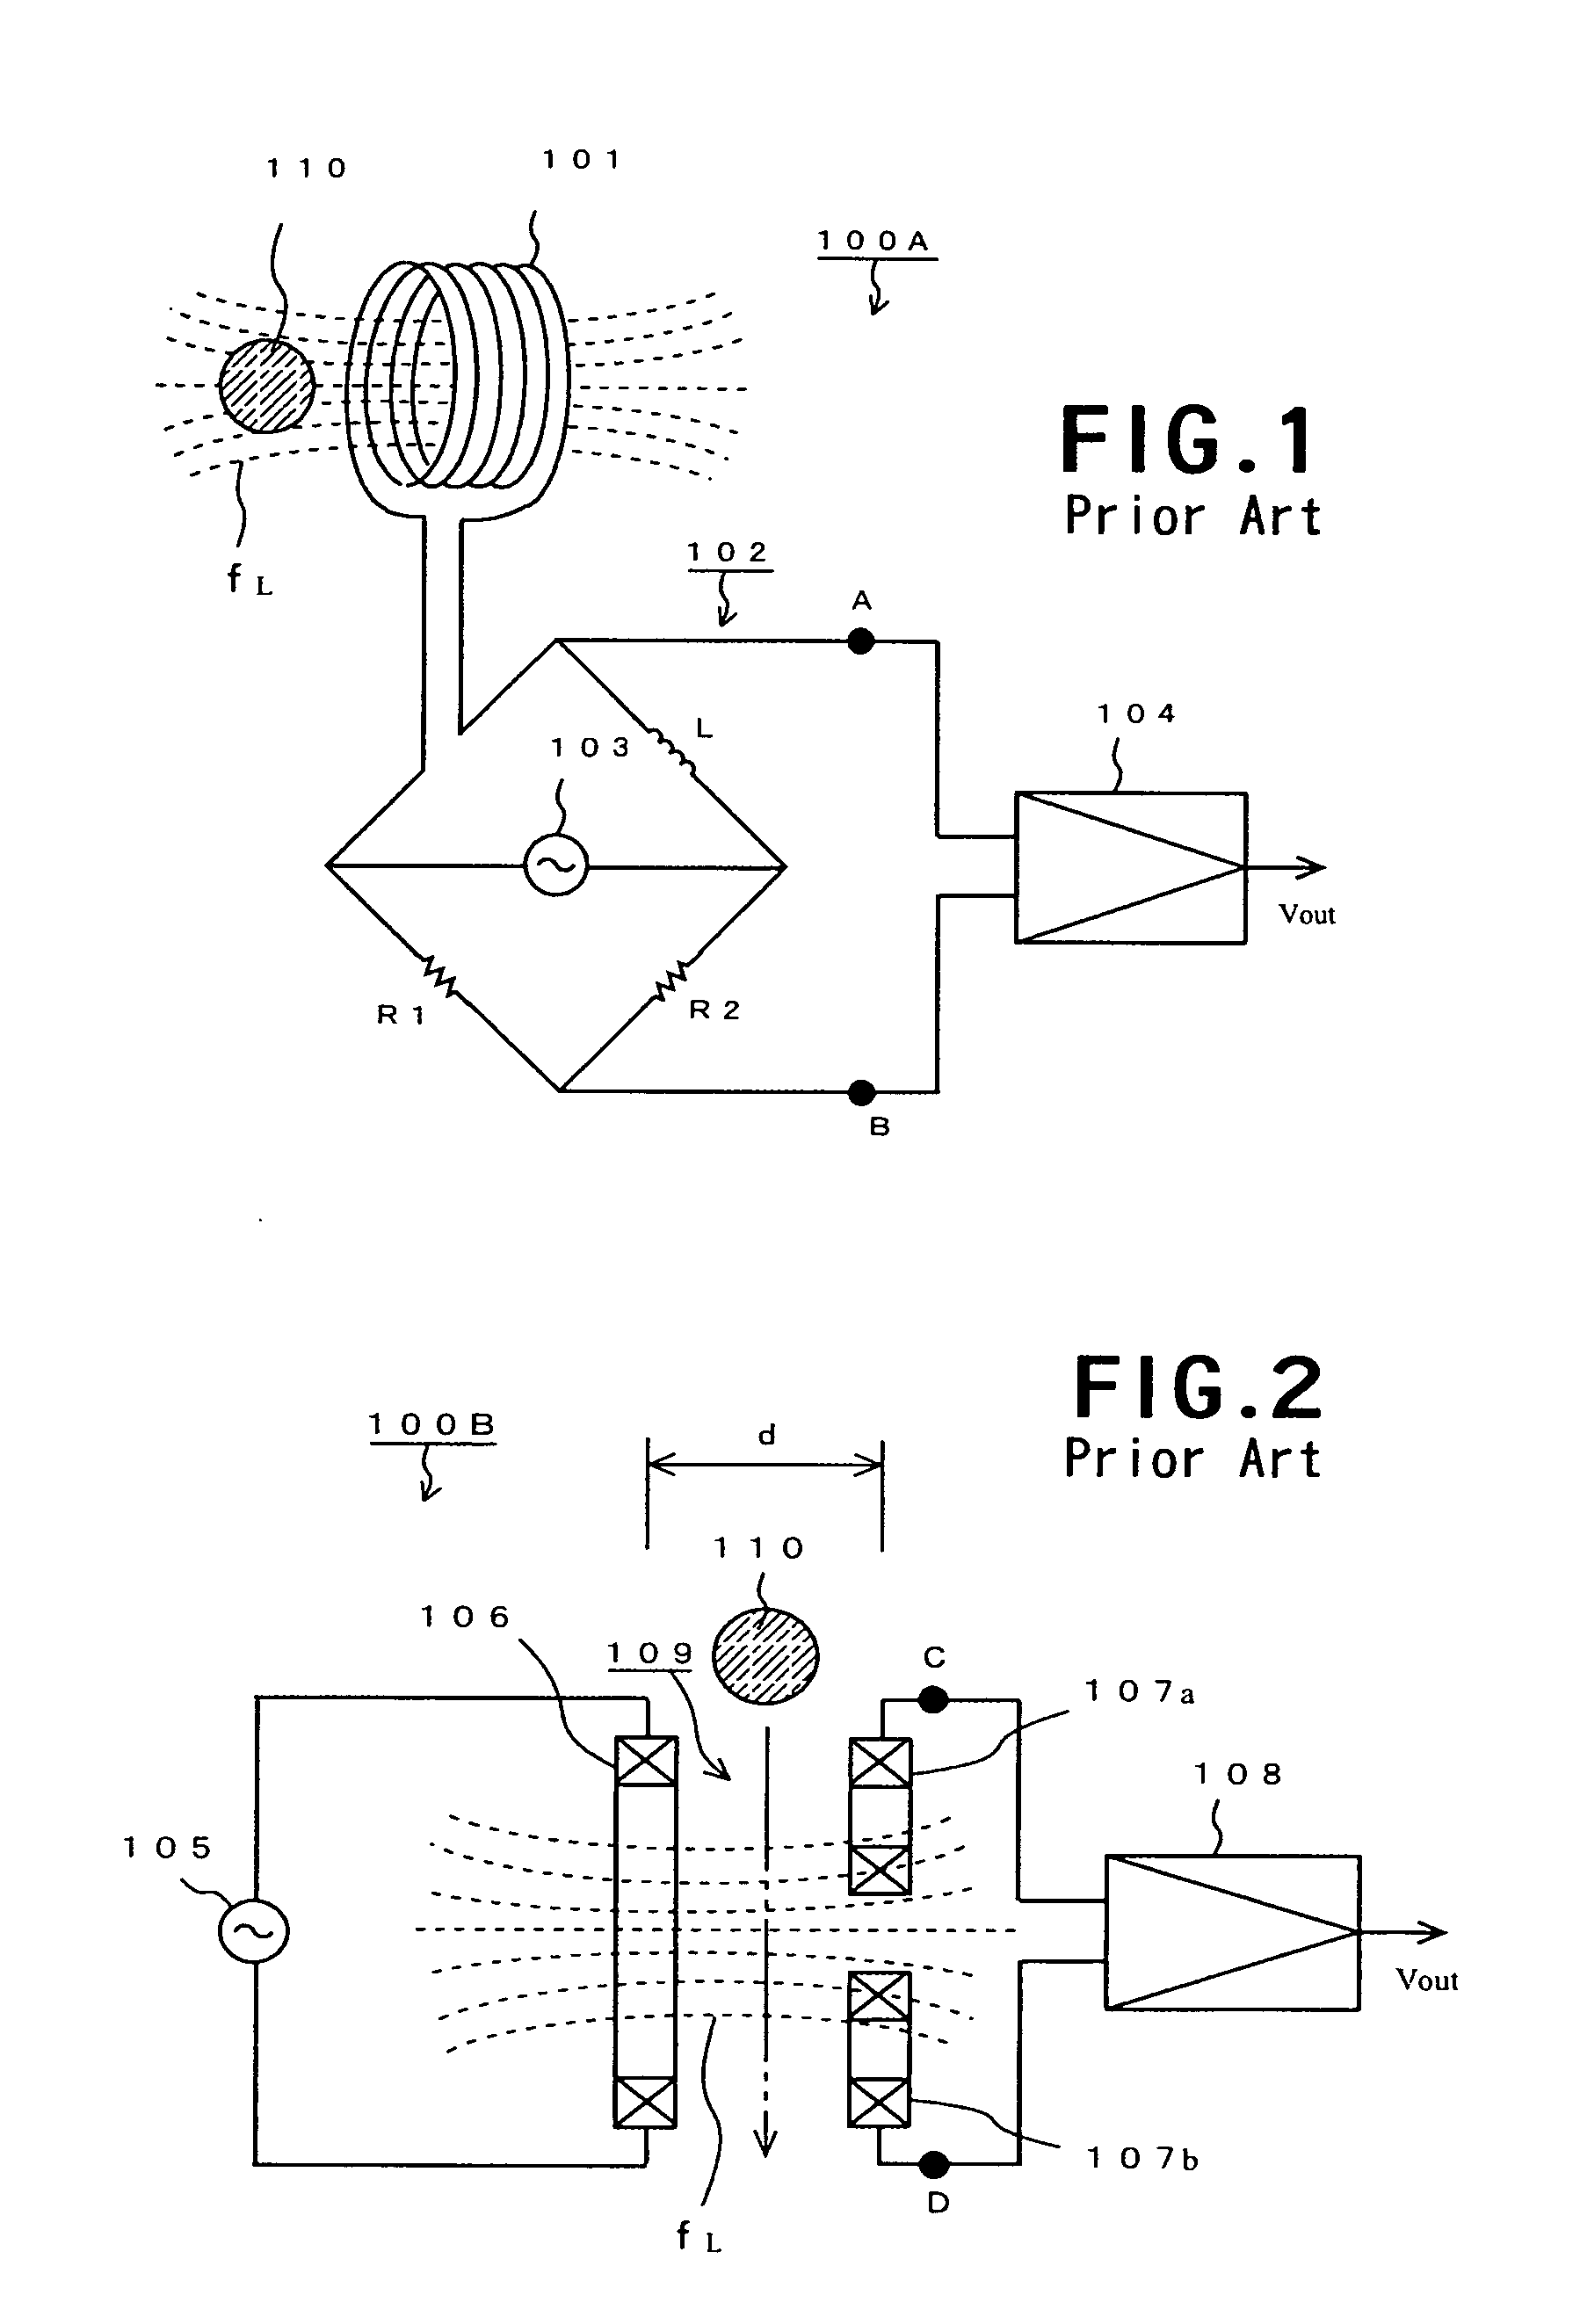
However, the self-inductance type inspection device 100A has a little bit of rate of change of self inductance (difference between the specified inductance and the inductance in changing), and thus, cannot detect the inductance unless the inspection object has sufficiently large dielectric constant or is made of material capable of bringing about a large change of magnetic field such as ferromagnetic material.
That is, the conventional inspection device has a low sensitivity, so that it cannot be applied to discrimination of the material of the inspection object and detection of the inspection object such as of nonferrous metal having a small rate of inductance change.
Thus, even though this conventional inspection device is desired to have the large inspection space (inspection space) between the exciting coil and the detection coils to inspect the large object, the inspection space is limited to be made large, so that the large object cannot be inspected substantively.
The inspection device using mutual inductance has another inevitable disadvantage.
For instance, the inductance of the detection coil 107a, which should be a standard inductance in the circuit, varies more or less with the change of the magnetic flux, resulting in cancellation of the electromotive force induced by the detection coil 107a due to the simultaneously-varied electromotive force induced by the detection coil 107b. The influence of the cancellation of the electromotive force is intricately varied with the relative position of the inspection object to the coils, consequently bringing about unignorable detection error in magnitude of the change of the expected electromotive force.
Besides, a signal appearing in the output from the exciting coil irrespective of the inspection object to be inspected is inevitably amplified with the desired signals, so a high sensitive detection cannot be expected.
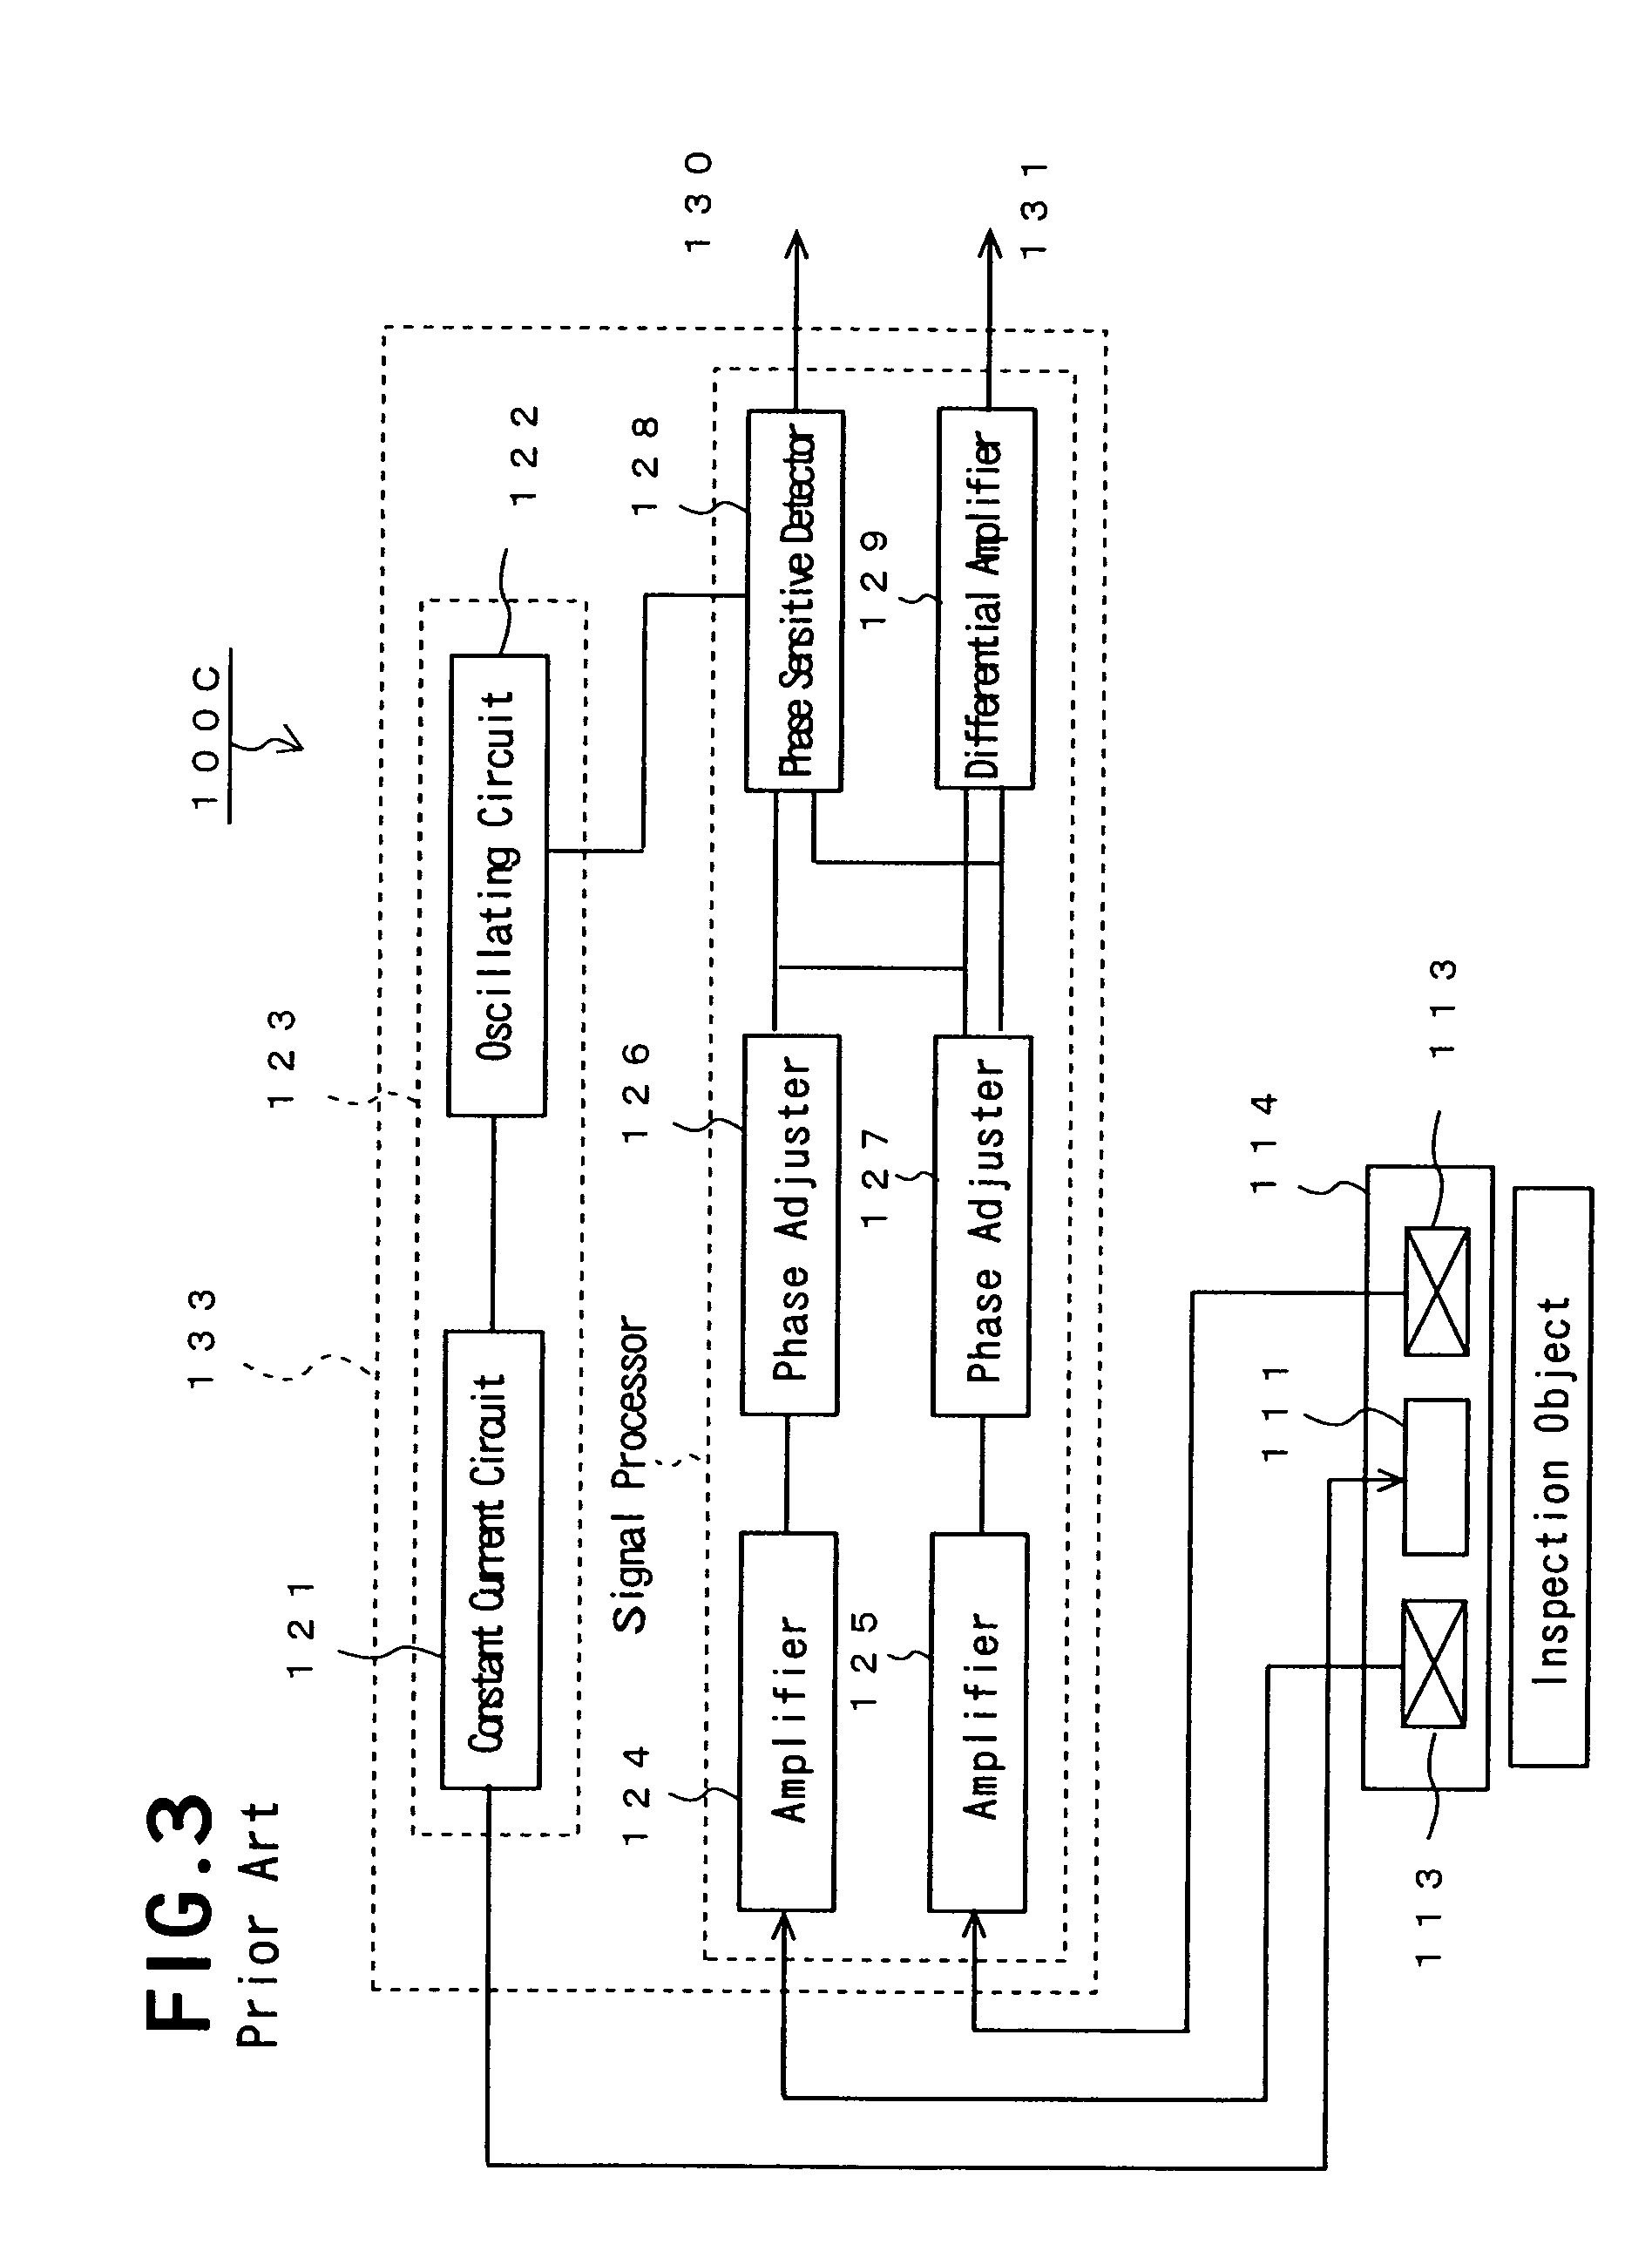
As noted above, the conventional electromagnetic induction type inspection devices have disadvantages of being inferior in detection accuracy of minute change in the inspection object and not applicable to a subtle inspection such as identification and discrimination of the material of the inspection object.
Meanwhile, the aforementioned differential output type magnaflux inspection device has also disadvantages such that the output from the detection sensor interferes mutually with the phase varying in inspecting the object, thus to hinder a high accuracy inspection.

Method used


Image

  • Electromagnetic induction type inspection device and method
  • Electromagnetic induction type inspection device and method
  • Electromagnetic induction type inspection device and method

Examples


example 2

Flaw Inspection of a Heat Exchange Pipe (with Artificial Defects)

[0106]As shown in FIG. 11, an inspection sample was prepared by artificially forming three flaws having a mil diameter of 1 mm and depths 0.5, 1.0 and 1.5 mm at intervals of 15 mm in the surface portion of a carbon steel pipe. The measurement of the flaws in the surface of the heat exchange pipe was conducted by inserting the sensor 20 within the heat exchange pipe. The result of the flaw inspection of the heat exchange pipe is shown in FIG. 12, from which it is found that the level values change linearly in effect relative to the depths of the flaws.

example 3

Thickness Inspection of a Carbon Steel Pipe Coated with Thermal Insulation Material (with Artificial Defects)

[0107]As shown in FIG. 13, an inspection sample was prepared by artificially forming thin thickness parts in the inner surface of a carbon steel pipe coated with thermal insulation material and further covered with stainless steel sheet of 0.2 mm in thickness. The thickness inspection was conducted by bringing the sensor into indirect contact with the inspection sample through a guide plate. The result of the thickness inspection of the pipe is shown in FIG. 14, from which it is found that both the level and phase values change with the reduced thicknesses of the pipe. Specifically, the level values largely change.

example 4

Butt Welding Inspection of a Stainless Steel Plate (with Artificial Defects)

[0108]As shown in FIG. 15, an inspection sample was prepared by artificially forming five crack-like flaws of 0.2 mm in width, 10 mm in length and 0.5, 1.0, 2.0, 3.0 and 4.0 mm in depth at intervals of 20 mm in a weld bead surface of butt welded steel plates of SUS304 of 25 mm in thickness. The butt welding inspection was carried out by applying the sensor 20 onto the weld bead surface of the inspection sample.

[0109]As seen in FIG. 16 showing the results of the bun welding inspection of the stainless steel plates, the flaws in the weld bead portion could be detected as changes in phase value. The fluctuation of phase data thus obtained is possibly caused by irregularities on the weld bead surface.


PUM


Abstract

Any inspection object regardless of material can easily be inspected or discriminated with high accuracy and high sensitivity by being placed in a magnetic field generated by applying an alternating current to an exciting coil and detecting changes of voltage level and phase of electromotive force induced by a detection coil unit. The discrimination of the inspection object is performed on the basis of a DC voltage value with respect to a standard specimen and a phase differential voltage value with respect to a phase difference between the phase of a voltage signal from the induction coil and the phase of the exciting current to the exciting coil.

Description

BACKGROUND OF THE INVENTION[0001]1. Field of the Invention[0002]This invention relates to an electromagnetic induction type inspection device and method for detecting defects such as void and foreign matter, abnormality, electric or magnetic characteristic changes of quenching and annealing, and minimal changes in electromagnetic characteristics of a material being tested by a change of electromagnetic induction. More particularly, this invention relates to an electromagnetic induction type inspection device and method for detecting defects in test materials such as structural parts in automobiles, industrial machines, rails, airplanes and architectural component elements for electric power plants, plant piping in oil factories, bridges, and buildings by placing the test material in a magnetic field induced by an exciting coil and measuring a change of electromagnetic induction.[0003]2. Description of the Related Art[0004]A change of magnetic flux is caused by placing a material obj...

Claims


Application Information

Patent Timeline
Patent Type & Authority Applications(United States)
IPC IPC(8): G01R33/12
CPCG01N27/9046
Inventor KOHAMA, HIROAKIYASOHAMA, KAZUHIKOIWAMOTO, MAKIOYAMAKI, TAKAYUKIFUJITOMI, ICHIRO
Owner KAISEI ENGINEER CO LTD
Why Eureka
Try Eureka